Mobile
Misc
- Notes from
- How to Make Mobile Apps With Shiny
- Basic financial app using {shinyMobile} (Code)
- How to Make Mobile Apps With Shiny
- Packages
- {shinyMobile} - Integrates the Framework7 mobile app framework that’s designed for Mobile-First applications
- {apexcharter} - Fast interactive charts
- {shiny.router} - Allows you to route mobile users to a different UI
- The Server part of the Shiny app remains the same.
- Apple App Store submission process involves setting up an Apple Developer account, paying the annual developer fee, and submitting your app for review.
- Troubleshooting
- Provisioning Profiles: Make sure your developer account is correctly set up, and you have the right provisioning profiles for development and distribution.
- App Performance: Check that your app performs well on actual devices, not just in simulators or as a web app.
UI
- Layout
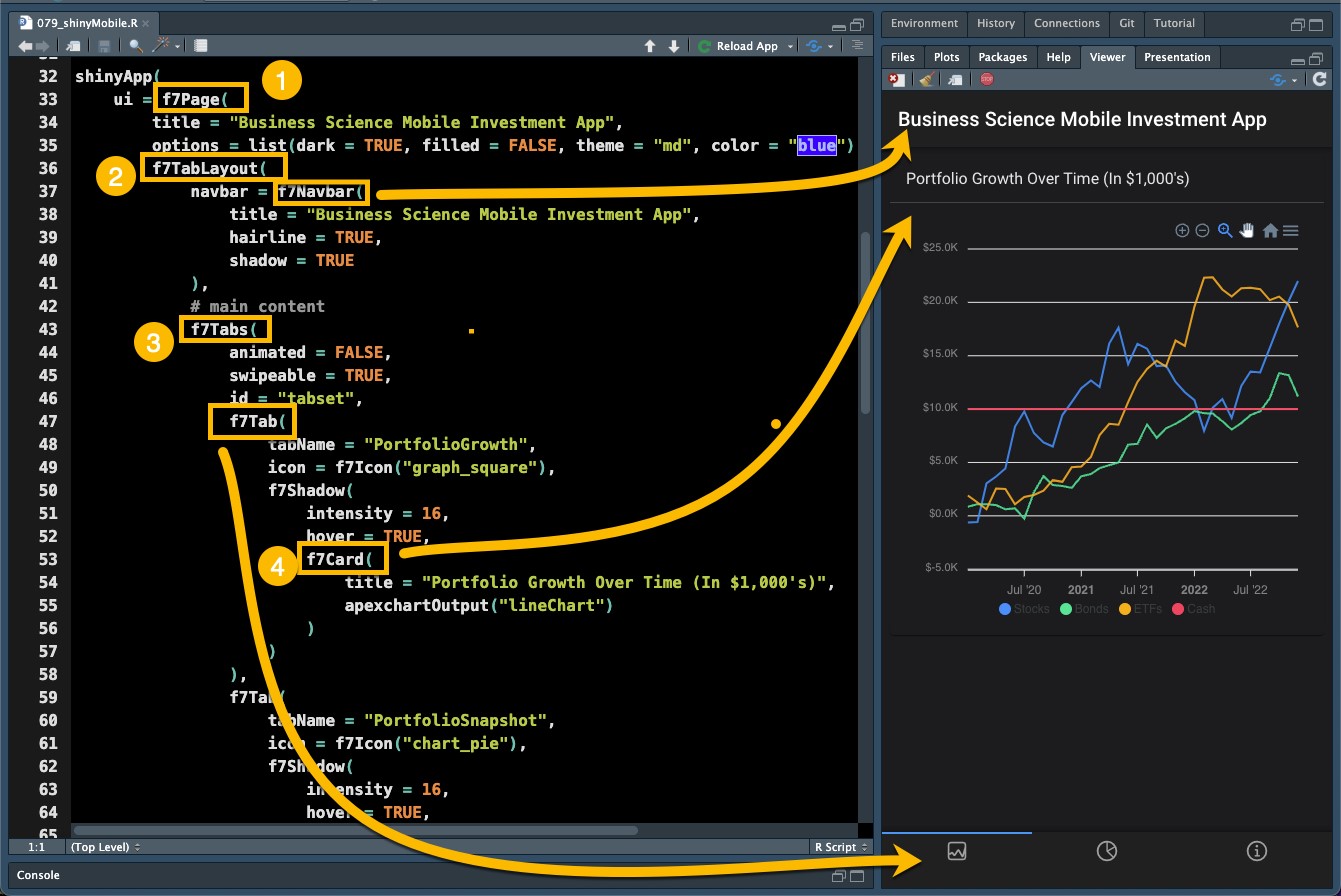
f7Pagethis sets up your mobile pagef7TabLayoutThis is the type of mobile layout. I prefer the Tab layout.f7Navbarsets up the navigation bar for your mobile app
f7TabsThese expose tabs at the bottom of the mobile screen. They are swipeable so the app actually feels like a mobile app.f7Tab: Each tab can be added that includes shiny content like inputs and outputs
f7Card: I use cards to house pieces of content like plots (in this case my portfolio growth plot)
Native Containers
- To to install an app on an iPhone, Android, etc. you need to wrap it in a native container.
- Capacitor
VS Code Extension
Dependencies (Docs)
- Android
- Android Studio
- An Android SDK installation
- iOS
- Xcode
- Xcode Command Line Tools
- Homebrew
- Cocoapods
- Android
Example: iOS containter
- 1
- Set Up Capacitor
- 2
- Create Capacitor Project
- 3
-
If your Framework7 project was set up using a specific build tool (like Webpack or Vite), follow the integration steps specific to that setup. Essentially, you’ll be configuring Capacitor to use the output directory of your web app as its
webDir. - 4
- Add iOS as a Platform
- 5
- Build Your Project: First, build your Framework7 project, then update Capacitor with the latest web assets
Docs show a slightly different install procedure which uses a -D flag for the cli install
appId: Specifies the app’s identifier. The id should be in a reverse-DNS format however, only alphanumeric and dot characters are allowed. e.g:
com.example.myapp. Maps to id attribute of widget element in capacitor.config.tsDocs show an alternative command,
npx cap init, which takes you through as series of questions about your app so it can fill out your configIn order to add iOS (or Android), you have to install their platforms
npm i @capacitor/android @capacitor/iosDocs show
npx cap syncinstead ofcopy, but actuallysyncrunscopyandupdate. So, it’s pretty much the same thing when you’re intiating an app. (Command Reference)
- Apache Cordova
List of Cordova requirements for each platform:
cordova requirementsExample: iOS container
- 1
- Install Cordova
- 2
- Create a Cordova Project
- 3
- Add iOS as a Platform
- 4
- Place your Framework7 app files into the www directory of the newly created Cordova project — replacing the existing files.
- 5
- Build the iOS App
- id: Specifies the app’s identifier. The id should be in a reverse-DNS format however, only alphanumeric and dot characters are allowed. e.g:
com.example.myapp. Maps to id attribute of widget element in config.xml
- app title: Application’s display title that maps name element in config.xml file
Project Structure
myapp/
|-- config.xml
|-- merges/
| | |-- android/
| | |-- ios/
|-- www/
|-- platforms/
| |-- android/
| |-- ios/
|-- plugins/
  |-- cordova-plugin-camera/
Xcode
- Apple’s IDE for creating native macOS, iOS, and iPadOS applications. You can install Xcode by using the Apple App Store on your Mac
- Set-Up
Install CLI and Verify Installation
xcode-select --install
xcode-select -p
# /Applications/Xcode.app/Contents/Developer
- Steps
- Open the Project in Xcode:
- For Cordova: Open the
.xcworkspacein theplatforms/ios/folder. - For Capacitor: Open the
.xcworkspaceinside theiosfolder.
- For Cordova: Open the
- Run the App: Connect your iPhone to your Mac, select your device in Xcode, and hit the run button to build and run the app on your device. You might need to configure your developer settings and provisioning profiles via Xcode if it’s your first time running an app on a physical device.
- Open the Project in Xcode: