Linux
Misc
Notes from
- Bash for Data Scientists, Data Engineers & MLOps Engineers
- Bunch of other stuff that I didn’t take notes on
- Bash Scripting on Linux: The Complete Guide - video course
- Bash for Data Scientists, Data Engineers & MLOps Engineers
Resources
- Doc - All on one page so you can just ctrl + f
- Bash Scripting Cheatsheet
- Curl Docs
- Data Science at the Command Line: Obtain, Scrub, Explore, and Model Data with Unix Power Tools
- The Sudonomicon
- Steve on Data’s Linux articles
Tools
- bat - Modern
catfunction for pretty printing. Written in Rust.- Syntax Highlighting: Bat provides syntax highlighting for a wide range of programming and markup languages.
- Line Numbers: It displays line numbers by default, helping users quickly locate and reference specific lines within a file.
- Git Integration: Bat can display Git modifications and file metadata directly in the output.
- Customizable Themes: Users can customize the color themes used for syntax highlighting to suit their preferences.
- Automatic Paging: Like the “cat” command, Bat can display the content of files, but it also includes automatic paging, allowing users to scroll through the content one screen at a time. You can navigate through the content using arrow keys, making it easier to read long files
- Coreutils - Universal (as in cross-platform) CLI utilities in Rust (multi-threaded and parallelizable) (See benchmark article against DuckDB)
- nano - text editor
- rga - A line-oriented search tool that allows you to look for a regex in a multitude of file types: pdf, docx, sqlite, jpg, movie subtitles (mkv, mp4), etc
- systemd - A secure mechanism for handling sensitive data like cryptographic keys, API tokens, certificates, and passwords in modern Linux systems. (hrbrmstr post, Guide, Service Hardening)
- bat - Modern
man <command>displays documentation for command-
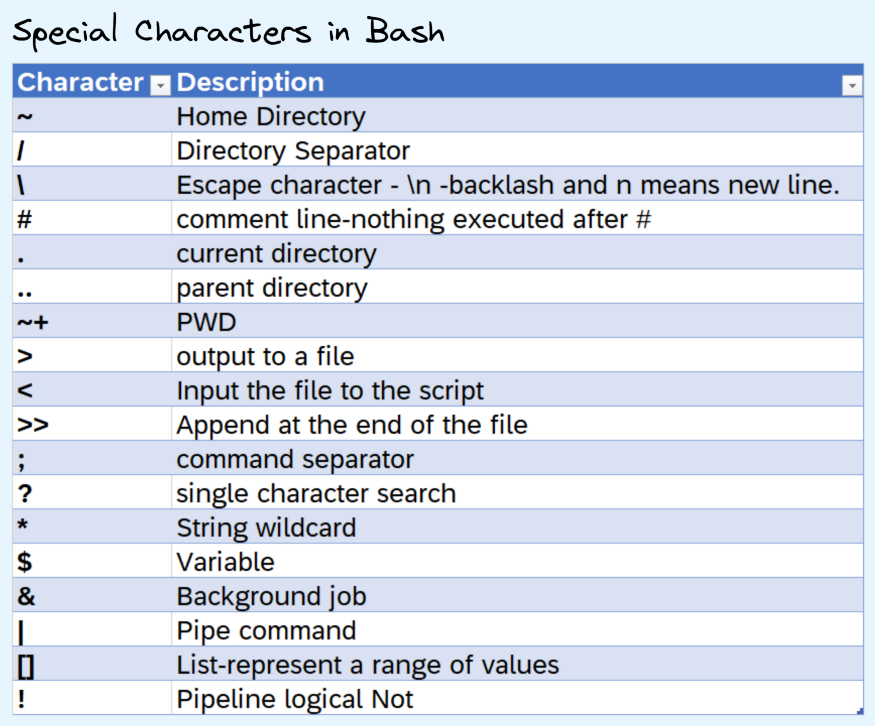
- “>” redirects the output from a program to a file.
- “>>” does the same thing, but it’s appending to an existing file instead of overwriting it, if it already exists.
- “>” redirects the output from a program to a file.
Make a project directory and go to that directory
mkdir code/project
cd $_
Get the dependency tree for a binary
ldd path/to/binary.bashrcis a shell script that Bash runs whenever it is started interactively. It initializes an interactive shell session. You can put any command in that file that you could type at the command prompt.- You put commands here to set up the shell for use in your particular environment, or to customize things to your preferences.
- A common thing to put in
.bashrcare aliases that you want to always be available.
The
/optdirectory is a standard directory used for installing optional or add-on software packages. It’s short for “optional” and is part of the Filesystem Hierarchy Standard (FHS).Create symlinks
- Also see
- Scripting for bash script for creating symlinks example
- CLI, Windows >> Powershell >> Misc for other details on symlinks
- Example: Personal R Environment for User1
Create symlinks for R version and package directory
su - user1
ln -s /opt/R/4.0.5/ ~/R-current

mkdir -p ~/R-lib
ln -s ~/R-lib ~/R-library

ls -l ~/R-current
A symlink called
R-currentin User1’s home directory, pointing to the R 4.0.5 installation.-s stands for “symbolic” link
Add symlinks to
.RenvironOpen
.Renvironnano ~/.RenvironAdd symlinks to environment variables
R_HOME=~/R-current
R_LIBS_USER=~/R-library
- Also see
passwdis a text file that stores user account information on Unix/Linux systems. Each line represents one user, and fields are separated by colonsExample:
john:x:1001:1001:John Doe:/home/john:/bin/bashField Meaning Value 1 Username john2 Password placeholder x3 User ID (UID) 10014 Group ID (GID) 10015 Full name or comment John Doe6 Home directory /home/john7 Shell /bin/bash
Debian vs. Ubuntu
Stability vs. Freshness:
- Debian: Debian is known for its stability and reliability. It has a rigorous testing process and a conservative approach to updates, which makes it suitable for servers and systems where stability is crucial.
- New versions released approximately every 2-3 years
- Receives regular security and maintenance updates but not feature updates.
- Ubuntu: Ubuntu is based on Debian but tends to be more up-to-date with software packages.
- New versions released every six months (April and October). Every two years, an LTS (Long-Term Support) version is released, which is supported for five years.
- Regular (non-LTS) releases receive updates for nine months, while LTS releases receive security and maintenance updates for five years
- Debian: Debian is known for its stability and reliability. It has a rigorous testing process and a conservative approach to updates, which makes it suitable for servers and systems where stability is crucial.
Package Management:
- Debian: Debian uses the Debian Package Management System (dpkg) and Advanced Package Tool (APT) for package management. It has a vast repository of software packages.
- Categorized into main, contrib, and non-free, with strict adherence to free software principles in the main repo
- Ubuntu: Ubuntu also uses dpkg and APT but adds its own software management tools like Snap and Ubuntu Software Center. This can make software installation more user-friendly.
- Categorized into main, universe, restricted, and multiverse, allowing more flexibility with proprietary and non-free software.
- Debian: Debian uses the Debian Package Management System (dpkg) and Advanced Package Tool (APT) for package management. It has a vast repository of software packages.
Community and Support:
- Debian:
- Community: It’s community-driven, so support may be slower and more focused on experienced users.
- Support: Primarily community-based through forums, mailing lists, and IRC channels
- Ubuntu:
- Community: A vibrant community and benefits from Canonical’s commercial backing, which provides professional support options.
- Support: In addition to community support, Ubuntu offers commercial support through Canonical, making it attractive for businesses.
- Debian:
Licensing:
- Debian:
- If you are committed to using entirely free and open-source software, Debian is the better choice. Debian’s strict licensing policy ensures that the software in its main repository adheres to the highest standards of software freedom.
- Users who need non-free software must enable the “contrib” or “non-free” repositories manually, making it clear when non-free software is being used.
- Ubuntu: While Ubuntu also includes mostly free and open-source software, it may include some proprietary drivers and software by default, which can be a concern for users who prioritize a completely open-source system
- Debian:
Performance
- Debian
- Server Performance: Debian is often preferred for servers due to its stability, minimal resource usage, and flexibility. It can be tuned for performance with fewer running services, making it ideal for high-performance server applications
- Lightweight Desktops: Debian can be configured to run very efficiently on desktops, especially with lightweight environments or minimal installations.
- Ubuntu
- General Desktop Use: Ubuntu is optimized for a good balance of performance and user experience. It’s a solid choice for general desktop use, especially on modern hardware.
- Cloud and Container Performance: Ubuntu is widely used in cloud and container environments (e.g., Ubuntu Server, Ubuntu Core), where its performance is optimized for these specific use cases
- Debian
Hardware
- Debian works well on older hardware. Debian still offers a 32-bit version of the distro, while Ubuntu no longer offers a 32-bit version.
Commands
Basic Commands
echo $SHELL- prints the type of shell you’re usingecho $PATH- prints all stored pathesexport PATH="my_new_path:$PATH"- store a new path- Command Syntax:
command -options arguments - Piping Commands:
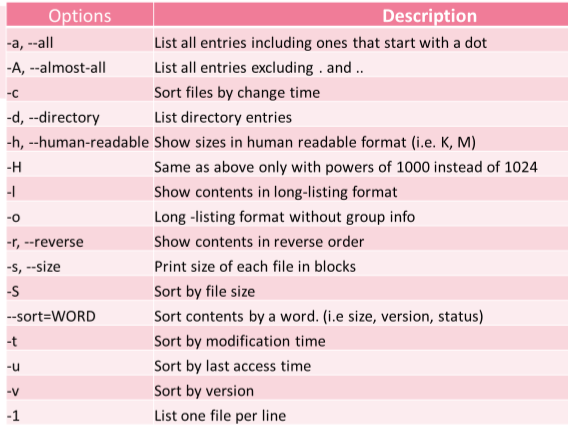
cat user_names.txt|sort|uniq du- Disk Usage; Useful for getting the size of directories (link)Flags
- -h - Human readable output (i.e. instead of bytes, you get kilobytes, megabytes, etc.)
- -s - Summarize; size of a particular directory in bytes
- -a - All files including directories
- -c - Calculates the total size of the printed output
- -d - Specify how levels deep into a directory you want stats for (e.g. -d 2)
- –time - Time of last modification
Example: Sort directories by size
du -sh /* | sort -hExample: Calculate size of directory
du -c -h /home/my/directory
Aliases
Custom commands that you can define in order to avoid typing lengthy commands over and over again
Examples
alias ll="ls -lah"
alias gs="git status"
alias gp="git push origin master"
Create safeguards for yourself
alias mv="mv -i"mvwill automatically use the i flag, so the terminal will warn you if the file you’re about to move does already exist under the new directory,- This way you don’t accidentally overwrite files that you didn’t mean to overwrite.
Files/Directories
-
- List 10 most recently modified files:
ls -lt | head - List files sorted by file size:
ls -l -S - List multiple directories:
ls ./docs ./text ./data
- List 10 most recently modified files:
List open files
List processes accessing a certain file
lsof <path_to_file>List all open files in a directory
lsof +D <path_to_directory>List files opened by pid(s)
lsof -p pid1
lsof -p pid1, pid2, pid3
List files opened by a command
lsof -c <command>- e.g. files opened by a http daemon, you just need to specify the command
httpd.
- e.g. files opened by a http daemon, you just need to specify the command
Count the lines of a file:
wc -l file.csvLook at first 3 rows:
head -n3 students.csvCreate/Delete Directories
mkdir <dir_name> rmdir <dir_name>- -v means “verbose” so it tells us if it was successful
Output to file:
echo “This is an example for redirect” > file1.txtAppend line to file:
echo “This is the second line of the file” >> file1.txtCreate/Delete file(s):
# Create files touch file1.txt touch file1.txt file2.tx # Delete files rm file1.txt rm file1.txt file2.txt rm -rf mydir- -r (recursive):
- Removes directories and their contents
- Without -r, rm can only delete files, not directories
- Goes through subdirectories and deletes everything inside
- -f (force):
- Suppresses confirmation prompts Doesn’t ask “are you sure?” for each file Ignores “file not found” errors (won’t complain if the file/directory doesn’t exist) Overrides file permissions (removes read-only files without asking)
- -r (recursive):
Move files/dir; Rename
# Move single file mv my_file.txt /tmp # Move multiple files mv file1 file2 file3 /tmp # move only .csv files to data directory and be verbose mv -v *.csv ./data/ # Move a directory or multiple directories mv d1 d2 d3 /tmp # Rename the file using move command mv my_file1.txt my_file_newname.txt- File(s) and directories being moved to “tmp” directory
Search
Find
# syntax find <path> <expression>
# Find by name
find . -name “my_file.csv"
#Wildcard search
find . -name "*.jpg"
# Find all the files in a folder
find /temp
# Search only files
find /temp -type f
# Search only directories
find /temp -type d
# Find file modified in last 3 hours
find . -mmin -180
# Find files modified in last 2 days
find . -mtime -2
# Find files not modified in last 2 days
find . -mtime +2
# Find the file by size
find -type f -size +10M
Search inside files
zgrep- Search the compressed file or files content just providing the search term.Default: Prints the matched file name and the complete line
Flags
- -i: Ignore case
- -n: Print only matched lines
- -v: Print only unmatched lines (i.e. not pattern)
- -o: Print only the matched part
- -l: Print only file names
- -h: Print only file lines
- -c: Count matched lines
- -e: Multiple search terms
Example: Search multiple files
zgrep ismail auth.log.*.gz- Searches for the term “ismail” all files beginning with “auth.log.” in their names.
- *Could also provide each file’s name separated by a space*
Example: Search for multiple terms
zgrep -e "ismail" -e "ahmet" auth.log.2.gz
Seach a project directory for a line of code
rg -t python "def main" . | fzf- ripgrep (rg)
- fzf install, article
Locate (faster)
Install
bash sudo apt install mlocate # DebianUsage
sudo updatedb # update before using
locate .csv
Unzip:
unzip ./foia.zipSplit files
# default: 1000 lines per file, names of new files: xaa, xab, xac, etc.
split my_file

# add a prefix to new file names
split my_file my_prefix

# specify split threshold (e.g. 5000) by number of lines
split --lines=5000 my_file

# specify split threshold by size (e.g. 10MB)
split --bytes=10 MB my_file
Permissions
Notes from Linux Permissions Explained: A Beginner’s Guide to File Security Command
- Also see FAQ
Definitions
- User (u): The file’s owner
- Group (g): Members of the file’s assigned group
- Check users and groups:
id
- Check users and groups:
- Others (o): Everyone else on the system
Levels
- Read (r): Value of 4
- Write (w): Value of 2
- Execute (x): Value of 1
Notation: The - seems to be a placeholder
- 7 (rwx) = 4 + 2 + 1
- 6 (rw-) = 4 + 2
- 5 (r-x) = 4 + 1
- 4 (r–) = 4
Examples
# Symbolic mode chmod u+x script.sh # Add execute permission for user chmod g-w file.txt # Remove write permission for group chmod o=r document.pdf # Set others to read-only # Numeric mode chmod 755 script.sh # rwxr-xr-x chmod 644 file.txt # rw-r--r-- # Standard web directory permissions chmod 755 /var/www/html chmod 644 /var/www/html/*.html # Create a shared directory mkdir /shared chmod 775 /shared chown :developers /shared # Make script executable chmod +x script.shchmod- edit permissions-rwxrwxrwx- sytax of permissions for a folder or directory- “rwx” stand for read, write, and execute rights, respectively
- The 3 “rwx” blocks are for (1) user, (2) user group, and (3) everyone else.
- In the given example, all 3 of these entities have read, write, as well as execute permissions.
- The dash indicates that this is a file. Instead of the dash, you can also see a “d” for directory or “l” for a symbolic link.
ls -l problematic-file.txtSee list of files and the permissionssudo- “super user” - using this prefix gives you all the permissions to all the filessudo su- opens a stand alone super user shellExamples
# Switch to root user
su -

# Execute single command as root
sudo apt update

# Edit system file with sudo
sudo nano /etc/hosts
chown- Change ownershipExamples
# Change owner
chown user1 file.txt

# Change owner and group
chown user1:group1 file.txt

# Recursive ownership change
chown -R user1:group1 directory/
unmask- sets default permissions for new files and directories# Check current umask umask # Set new umask umask 022 # Results in 755 for directories, 644 for files
Print file content
cat < my_file.txt
# or
cat my_file.txt
Print 1 pg at a time:
less my_file.txtPrint specific number of lines:
head -n<num_lines> <file.csv>Print file content from bottom to top:
tac my_file.txtcat -b log.txt | grep error: shows all lines in log.txt that contain the string ‘error’, along with the line number (-b)
Logicals and Conditionals
- Logicals
; :
command1 ; command2- command 1 and command 2 run independently of each other
& :
command1 & command2- command 1 runs in the background and command 2 runs in the background
&& :
command1 && command2- If the first command errors out then the second command is not executed
|| :
command1 || command2- The second commmand is only execute if the first command errors
Example
cd my_dir && pwd || echo “No such directory exist.Check”- If the my_dir exists, then the current working directory is printed. If the my_dir doesn’t exist, then the message “No such directory exists. check” message is printed.
- Conditionals
- Use
[[ ]]for conditions inif/whilestatements, instead of[ ]ortest.[[ ]]is a bash builtin, and is more powerful than[ ]ortest.- Example:
if [[ -n "${TRACE-}" ]]; then set -o xtrace; fi
- Use
String Matching
Example: Search for “error” and write to file
#output to a file again cat file1 file2 file3 | grep error | cat > error_file.txt #Append to the end cat file1 file2 file3 | grep error | cat >> error_file.txt- Prints lines into grep which searches for “error” in each line. Lines with “error” get written to “error_file.txt”
Filter lines
grep -i “Doctorate” adult_t.csv |grep -i “Husband”|grep -i “Black”|csvlook # -i, --ignore-case-Ignore case distinctions, so that characters that differ only in case match each other.- Select all the candidates who have doctorates and a husband and race are Black
csvlookis pretty printing from csvkit package (see Big Data >> Larger Than Memory >> csvkit)
Count how many rows fit the criteria
grep -i “Doctorate” adult_t.csv | wc -l- Counts how many rows have “Doctorate”
- -wc is “word count”
- Counts how many rows have “Doctorate”
Input/Output
Standard FIle Descriptors
FD Name Description Typical Default 0 stdinStandard input (keyboard/pipe) /dev/tty1 stdoutStandard output (screen) /dev/tty2 stderrStandard error (screen) /dev/tty/dev/ttyis a special device file that represents the current terminal for a process- It’s a synonym for the controlling terminal of the current process
- Every process has a controlling terminal (if it was started from a terminal)
ttystands for Teletype — a historical term for terminal devices.
Output Redirections
# to files command 1> file.txt # Redirect stdout to a file named "file.txt" command 2> errors.log # Redirect stderr to a file named "errors.log" # to file descriptors command 1>&2 # Redirect stdout to wherever stderr is currently going command 2>&1 # Redirect stderr to wherever stdout is currently going command >&2 # Same as 1>&2 (stdout implied when no number before >)- Without
&refers to a filename - With
&refers to a File Descriptor
- Without
Creating and Using Non-Standard File Descriptors
# create fd
exec 3> output.log   # Open FD 3 for writing to output.log
echo "test" >&3     # Write to FD 3
exec 3>&-           # Close FD 3

# reading from additional FDs
exec 4< input.txt   # Open FD 4 for reading from input.txt
read line <&4       # Read from FD 4
exec 4<&-           # Close FD 4

# appending with FDs
command >> file           # Append stdout
command 2>> error.log     # Append stderr
command &>> both.log      # Append both (bash)
Variables
Misc
- autoenv - If a directory contains an
.envfile, it will automatically be executed when youcdinto it
- autoenv - If a directory contains an
Local Variable:
- Declared at the command prompt
- Use lower case for name
- Available only in the current shell
- Not accessible by child processes or programs
- All user-defined variables are local variables
Environment (global) variables:
- Create with
exportcommand - Use upper case for name
- Available to child processes
- Create with
Declare local and environment variables then access via “$”
# local ev_car=’Tesla’ echo 'The ev car I like is' $ev_car # environment export EV_CAR=’Tesla’ echo 'The ev car I like is' $EV_CAR- No spaces in variable assignment
Calling variables
${var}or$varvs${var?}mv file1 file2 $subdir # oops, I overwrote file2 mv file1 file2 ${subdir?} # error message instead of disaster- Using
${var?}throws an error whenvarhas not been defined
- Using
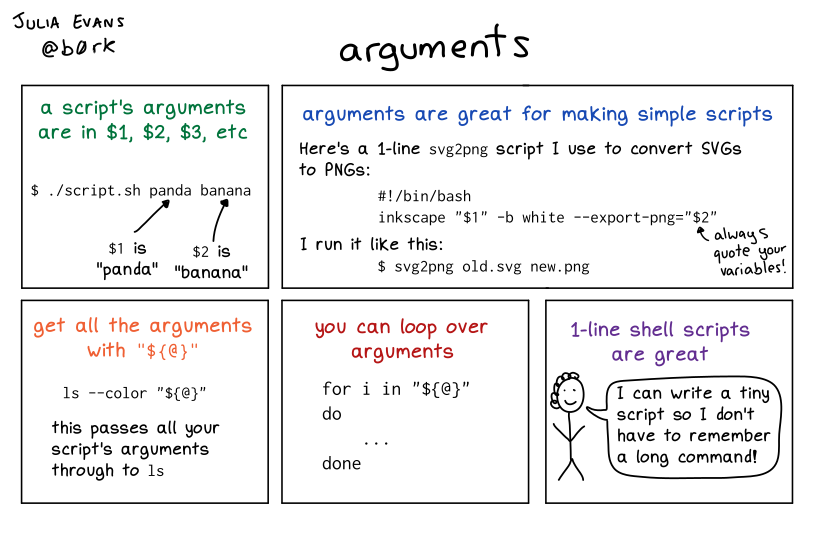
Always quote variable accesses with double-quotes.
- One place where it’s okay not to is on the left-hand-side of an
[[ ]]condition. But even there I’d recommend quoting. - When you need the unquoted behaviour, using bash arrays will likely serve you much better.
- One place where it’s okay not to is on the left-hand-side of an
Functions
- Use local variables in functions.
- Accept multiple ways that users can ask for help and respond in kind.
- Check if the first arg is -h or –help or
helpor justhor even -help, and in all these cases, print help text and exit.
- Check if the first arg is -h or –help or
- When printing error messages, please redirect to stderr.
- Use
echo 'Something unexpected happened' >&2for this
- Use
Functions
Basic
say_hello() {
  echo "hello"
}
say_hello
Using Return
failing_func () { return 1 }returncannot take strings — only numbers 1 to 255
With arguments
say_hello() {
  echo "Hello $1 and $2"
}
say_hello "Ahmed" "Layla"
Declaring local and global variables
say_hello() { local x x=$(date) y=$(date) }localis a keyword- x is local and y is global
Suppress errors
local x=$(moose)- When
localis used in the same line as the variable declaration, then the variable never errors. e.g. Even if moose doesn’t exist, this line won’t trigger an error
- When
Loops
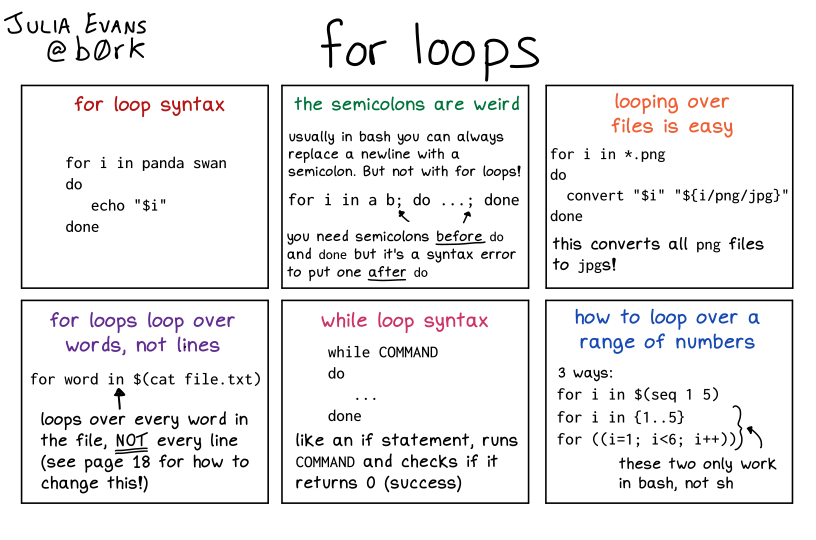
- For
Misc
Notes from Flow Control in Linux: Mastering For Loops for Beginners
Always quote variables to avoid word splitting and issues with spaces,
- e.g.
for i in “$var”orcat "$file"
- e.g.
Flavors
Traditional Shell Form - Used mainly for iterating through lists of items
C Language Form - Used mainly for numeric sequences
Syntax
for ((expression1; expression2; expression3)); do commands doneexpression1: Initialization (executed before the loop starts)expression2: Condition (checked before each iteration)expression3: Modification (executed after each iteration)
Syntax Comparison
Type Syntax Example Use Case Traditional for var in list for i in A B C; do echo $i; done List iteration C-style for ((expr;expr;expr)) for ((i=0;i<5;i++)); do echo $i; done Counter loops Range for var in {x..y} for i in {1..5}; do echo $i; done Sequences Command for var in $(cmd) for i in $(ls); do echo $i; done Command output Traditional: Basic Examples
#!/bin/bash
for i in A B C D; do
    echo $i
done
#> A
#> B
#> C
#> D

for i in {1..5}; do
    echo "Number $i"
done
#> Number 1
#> Number 2
#> Number 3
#> Number 4
#> Number 5

for file in *.txt; do
    echo "Processing $file"
done

#> Processing read_integer.txt
#> Processing test_file.txt
C-Style: Basic Examples
#!/bin/bash
for ((i=0; i<5; i++)); do
    echo "Index $i"
done
#> Index 0
#> Index 1
#> Index 2
#> Index 3
#> Index 4
Command Substitution Method
#!/bin/bash for user in $(cat /etc/passwd | cut -d: -f1); do echo "User: $user" done- Iterates through the list of usernames from the
/etc/passwdfile. The$(command)command substitution syntax executes the command and returns its output as a list.- Example on line in the file:
john:x:1001:1001:John Doe:/home/john:/bin/bash
- Example on line in the file:
- The pipe (
|) andcutprocess the file line by line - -d: says the delimiter is a colon
- -f1 says extract the first field
- Iterates through the list of usernames from the
Nested Loops
#!/bin/bash
for i in {1..3}; do
    for j in {1..3}; do
        echo "Position $i,$j"
    done
done

#> Position 1,1
#> Position 1,2
#> Position 1,3
#> Position 2,1
#> Position 2,2
#> Position 2,3
#> Position 3,1
#> Position 3,2
#> Position 3,3
Error-Checking
for file in *.txt; do
    if [ -f "$file" ]; then
        echo "Processing $file"
    else
        echo "Error: $file is not a regular file"
    fi
done
Snippets
Create Multiple Directories
#!/bin/bash
for name in project1 project2 project3; do
    mkdir -p "$name"
    echo "Created directory: $name"
done
Create Multiple Files
#!/bin/bash

# Create a directory for the output files
mkdir output

# Loop through numbers 0 to 9 and create empty files
for i in {0..9}; do
    touch "output/sample_${i:0:3}.txt"
done

echo "Files created in the output directory."
The ${i:0:3} syntax ensures that the number i is padded with leading zeros to a width of 3 digits.
Files that get created
output/sample_000.txt
output/sample_001.txt
output/sample_002.txt
...
Rename FIles
#!/bin/bash
count=1
for file in *.jpg; do
    mv "$file" "image_$count.jpg"
    ((count++))
done

#> image_1.jpg
#> image_2.jpg
#> image_3.jpg
Scripting
Use the .sh (or .bash) extension for your script
Use long options, where possible (like –silent instead of -s). These serve to document your commands explicitly.
If appropriate, change to the script’s directory close to the start of the script.
- And it’s usually always appropriate.
- Use
cd "$(dirname "$0")", which works in most cases.
Use
shellcheck— analysis too for shell scripts. Heed its warnings. (link)Shebang line
- Contains the absolute path of the bash interpreter
- List paths to all shells:
cat/etc/shells
- List paths to all shells:
- Use as the first line even if you don’t give executable permission to the script file.
- Starts with “#!” the states the path of the interpreter
- Example:
#!/bin/bash- Interpreter installed in directory “/bin”
- Example:
#!/usr/bin/env bash
- Contains the absolute path of the bash interpreter
Commands that should start your script
- Use
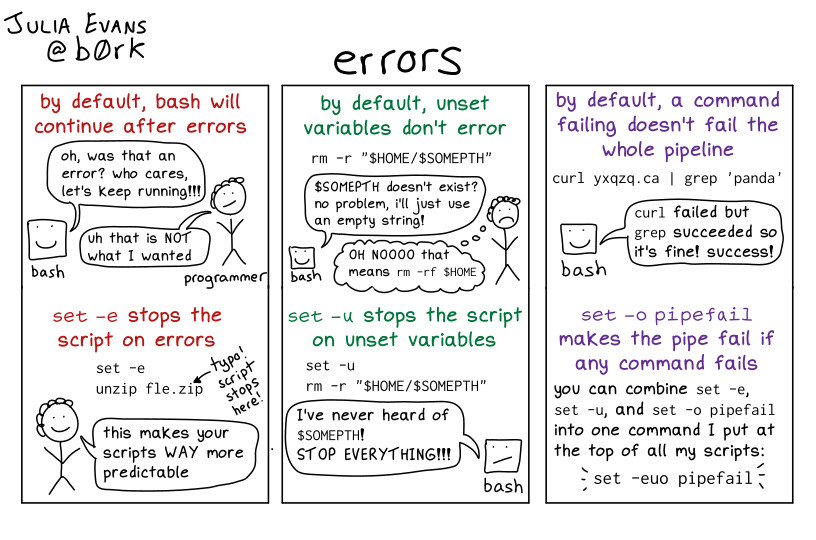
set -o errexit- So that when a command fails, bash exits instead of continuing with the rest of the script.
- Use
set -o nounset- This will make the script fail, when accessing an unset variable. Saves from horrible unintended consequences, with typos in variable names.
- When you want to access a variable that may or may not have been set, use
"${VARNAME-}"instead of"$VARNAME", and you’re good.
- Use
set -o pipefail- This will ensure that a pipeline command is treated as failed, even if one command in the pipeline fails.
- Use
set -o xtrace, with a check on$TRACEenv variable.- For copy-paste:
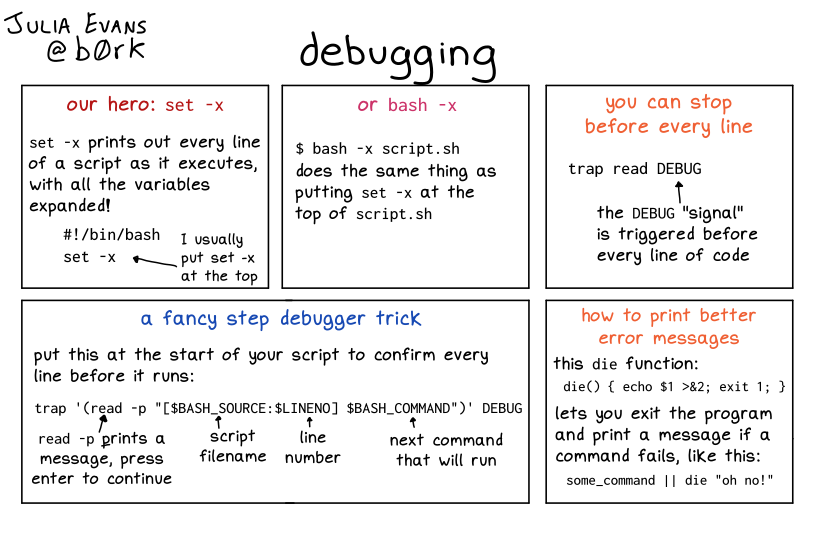
if [[ -n "${TRACE-}" ]]; then set -o xtrace; fi. - This helps in debugging your scripts, a lot.
- People can now enable debug mode, by running your script as
TRACE=1 ./script.shinstead of./script.sh.
- For copy-paste:
- Use
Example: Basic Execution a Bash Script
Create a directory bash_script:
mkdir bash_scriptCreate a hello_world.sh file:
touch hello_script.shOpen hello_script.sh (text editor?)
Add code, save, and close
#!/bin/bash
echo ‘Hello World’
Make file executable:
chmod +x hello_world.shExecute file:
./hello_world.sh
Example: Create symlinks for mulitple accounts
#!/bin/bash for user in user1 user2 user3; do sudo -u $user ln -s /opt/R/4.0.5/ /home/$user/R-current sudo -u $user mkdir -p /home/$user/R-lib sudo -u $user ln -s /home/$user/R-lib /home/$user/R-library echo -e "R_HOME=/home/$user/R-current\nR_LIBS_USER=/home/$user/R-library" | sudo tee -a /home/$user/.Renviron done- Also see Misc >> Create Symlinks
Example: Reporting Disk Space in Home Directories (source)
#!/bin/bash # report_home_space: Reports disk space usage for home directories # Define the table format using printf notation format="%8s%10s%10s\n" # Set the directory list and user name based on privileges if [[ $(id -u) -eq 0 ]]; then dir_list="/home/*" user_name="All Users" else dir_list="$HOME" user_name="$USER" fi echo "<H2>Home Space Utilization for $user_name</H2>" # Loop through each directory in the list for dir in $dir_list; do total_files=$(find "$dir" -type f 2>/dev/null | wc -l) total_dirs=$(find "$dir" -type d 2>/dev/null | wc -l) total_size=$(du -sh "$dir" 2>/dev/null | cut -f1) echo "<H3>$dir</H3>" echo "<PRE>" printf "$format" "Dirs" "Files" "Size" printf "$format" "----" "-----" "----" printf "$format" "$total_dirs" "$total_files" "$total_size" echo "</PRE>" done #> <H2>Home Space Utilization for steve</H2> #> <H3>/home/steve</H3> #> <PRE> #> Dirs Files Size #> ---- ----- ---- #> 17 34 5.5M #> </PRE>- The script checks if the current user is root.
- If root, it lists all home directories; otherwise, it lists the current user’s home directory.
- It sets the directory list accordingly (/home/* for all users or $HOME for the current user).
- For each directory, it counts files and subdirectories using find and calculates size with du.
- The output is formatted in a table-like structure for clarity.
Template
#!/usr/bin/env bash
set -o errexit
set -o nounset
set -o pipefail
if [[ -n "${TRACE-}" ]]; then
    set -o xtrace
fi
if [[ "$1" =~ ^-*h(elp)?$ ]]; then
    echo 'Usage: ./script.sh arg-one arg-two
This is an awesome bash script to make your life better.
'
    exit
fi
cd "$(dirname "$0")"
main() {
    echo do awesome stuff
}
main "$@"
Debugging
- Also see
set -o xtracein Scripting >> Commands that should start your script
Job Management
Programs/Scripts will by default run in the foreground, and prevent you from doing anything else until the program is done.
While program is running:
- control+c - Will send a SIGINT (signal interrupt) signal to the program, which instructs the machine to interrupt the program immediately (unless the program has a way to handle these signals internally).
- control+z - Will pause the program.
- After pausing the program can be continued either by bringing it to the foreground (
fg), or by sending it to the backgroud (bg).
- After pausing the program can be continued either by bringing it to the foreground (
Execute script to run in the background:
Example: Basic
python run.py &Example:
nohup uv run main.py > script.log 2>&1 &nohup- “No hangup” - ensures the process continues running even if the terminal session ends or the user logs out.uv run main.py- Usesuv(a fast Python package installer and resolver) to runmain.pywith the proper Python environment.> script.log- Redirects standard output (stdout) to a file namedscript.log.2>&1- Redirects standard error (stderr) to the same place as stdout (thescript.logfile).2= stderr (file descriptor 2)&1= “to the same place as file descriptor 1 (stdout)”
&- Runs the command in the background, returning control to the terminal immediately.
jobs- Shows all running jobs and process ids (PIDS)ps(process status) - Provides a static snapshot of active processes at the moment of execution.- Ideal for scripting, logging, or analyzing processes at a specific point in time.
ps auxa: Displays processes from all users, not just the current user.u: Formats output with user-oriented details like CPU and memory usage.x: Includes processes without an attached terminal, such as daemons and background services.- See article for usage
toporhtop- Monitor active processes in real-timekill- Sends signals to jobs running in the backgroundkill -STOP %1sends a STOP signal, pausing program 1.kill -KILL %1sends a KILL signal, terminating program 1 permanently
Kill all processes using a certain port (e.g. tcp 3000)
fuser -k 3000/tcp
sudo fuser -k 3000/tcp
Some processes restart after being killed. If so, then you have to manually stop each one
sudo systemctl stop apache2List of open ports and network connections
lsof -i #> COMMAND PID USER FD TYPE DEVICE SIZE/OFF NODE NAME #> sshd 920 root 3u IPv4 20507 0t0 TCP *:ssh (LISTEN) #> sshd 920 root 4u IPv6 20535 0t0 TCP *:ssh (LISTEN) #> docker-pr 1163 root 4u IPv6 21687 0t0 TCP *:https (LISTEN) #> docker-pr 1175 root 4u IPv6 21717 0t0 TCP *:http (LISTEN) #> sshd 7528 root 3u IPv4 39506588 0t0 TCP testing:ssh->212.91.91.19:58904 (ESTABLISHED) #> systemd-r 10993 systemd-resolve 12u IPv4 20901990 0t0 UDP localhost:domain #> systemd-r 10993 systemd-resolve 13u IPv4 20901991 0t0 TCP localhost:domain (LISTEN) lsof -i :<port_number> lsof -i tcp lsof -i tcp:3000lsofis typically used for finding files opened by processes (See Commands >> Files/Directories)
tmux
- Terminal Multiplexer
- Enables you to easily create new terminal sessions and navigate between them. This can be extremely useful, for example you can use one terminal to navigate your file system and another terminal to execute jobs.
- Installation (if necessary):
sudo apt install tmux- Typically comes with the linux installation
- Sessions
tmux- starts an unnamed sessiontmux new -s moosecreates new terminal session with name ‘moose’tmux ls- lists all running sessionstmux kill-session -t moose- kills session named “moose”exit- stops and quits the current session- Kill all sessions (various opinions on how to do this)
tmux kill-sessiontmux kill-servertmux ls | grep : | cut -d. -f1 | awk '{print substr($1, 0, length($1)-1)}' | xargs kill
- Attach/Detach
- When you log out of a remote machine (either on purpose or accidentally), all of the programs that were actively running inside your shell are automatically terminated. On the other hand, if you run your programs inside a tmux shell, you can come simply detach the tmux window, log out, close your computer, and come back to that shell later as if you’ve never been logged out.
tmux detach- detach current session- control+b
then pressd`: When you have multiple sesssions running, this will allow you to select the session to detach - From inside bash and not inside a session
tmux a: attach to latest created sessiontmux a -t moose: attach to session called ‘moose’
- Pane Creation and Navigation
- control+b then press ” (i.e. shift+’): add another terminal pane below
- control+b then press % (i.e. shift+5) : add another terminal pane to the right
- control+b then press → : move to the terminal pane on the right (similar for left, up, down)
SSH
- Typically uses a key pair to log into remote machines
- Key pair consists of a public key (which both machines have access to) and a private key (which only your own machine has access to)
- “ssh-keygen” is a program for generating such a key pair.
- If you run ssh-keygen, it will by default create a public key named “id_rsa.pub” and a private key named “id_rsa”, and place both into your “~/.ssh” directory
- You’ll need to add the public key to the remote machine by piping together cat, ssh, and a streaming operator
cat .ssh/id_rsa.pub | ssh user@remote 'cat >> ~/.ssh/authorized_keys'
- Connect to the remote machine:
ssh remote -i ~/.ssh/id_rsa - Create a config file instead
Location: “~/.ssh/config”
Contents
Host dev
  HostName remote
  IdentityFile ~/.ssh/id_rsa
- Connect using config:
ssh dev - For Windows and using Putty, see
- AWS >> EC2 >> Connect to/ Terminate Instance
- Projects Notebook >> Article, Nested Cross Validation >> Notes >> Running EC2 instances checklist
Packages
- Notes from
- Common package managers: apt, Pacman, yum, and portage
- Debian, Ubuntu: apt, dpkg (low-level)
- Red Hat-based: yum, rpm (low-level)
- APT (Advanced Package Tool)
The
aptcommand is a smaller section of theaptandapt-cacheoptions. Theaptcommand gives the end user just enough tools to install, remove, search and update APT packages. Theaptcommand has a lot more options that are useful for writing low-level scripts and tools.Install Packages
# one pkg sudo apt install <package_name> # multiple sudo apt install <pkg_name1> <pkg_name2>- Install but no upgrade:
sudo apt install <pkg_name> --no-upgrade
- Install but no upgrade:
Install a package file from a file
dpkg –install <package_file>Remove a package
apt remove <package_name>List installed packages:
dpkg –listSearch for an installed package:
apt-cache search <pkg_name>Get package information:
apt-cache show <package_name>
dpkg –status <package_name>
Update package information prior to “upgrading” the packages
sudo apt update- Downloads the package lists from the repositories and “updates” them to get information on the newest versions of packages and their dependencies.
Upgrade
# all installed packages sudo apt upgrade # To upgrade only a specific program sudo apt upgrade <package_name> # Upgrades and handles dependencies; delete obsolete, add new apt dist-upgrade # together sudo apt update && sudo apt dist-upgrade- Can add these flags after
updateto get a less verbose output-q(quiet): Reduces output, shows less detailed information-qq(very quiet): Minimal output, only shows errors and critical information-qqq: Even more quiet (though rarely used)
- Can add these flags after
Upgrade from a file:
dpkg –install <package_file>Backtrace file installation to a package:
dpkg –search <file_name>
- yum
Install packages
yum install <package_name>Install a package file from a non-repository source
rpm -i <package_file>Remove a package
yum erase <package_name>List installed packages:
rpm -qaSearch for an installed package
yum search <package_name>Get package information:
yum info <package_name>
rpm -q <package_name>
Update installed packages:
yum updateUpgrade from file:
rpm -U package_fileBacktrace a file installation to a package:
rpm -qf <file_name>
Expressions
- Sort data, filter only unique lines, and write to file:
cat adult_t.csv | sort | uniq -c > sorted_list.csv
