General
Misc
Resource
Tools (see article, article for installation and usage)
- ruff - rust-based, linter and sorts imports
- Fast, sensible default settings, focuses on more important things out of the box, and has less legacy burden
- pydocstring - tool for checking compliance with Python docstring conventions
- black - code formatter
- isort - sorts your imports
- uv - Package Manager
- pytest, pytest-watch - unit tests
- commitizen - guides you through a series of steps to create a commit message that conforms to the structure of a Conventional Commit
- nbQA - linting in jupyter notebooks
- mypy - type checker; good support and docs
- pylance - checks type hinting in VSCode (see Functions >> Documentation >> Type Hinting)
- Posit uses Pyright
- doit - task runner; {targets}-like tool; tutorial
- pre-commit (Video)- Specify which checks you want to run against your code before committing changes to your git repository
- README templates - link
- ruff - rust-based, linter and sorts imports
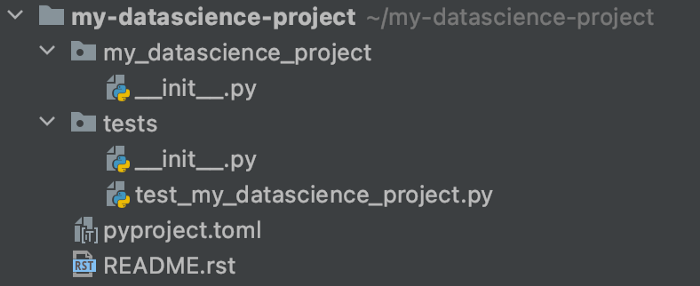
Project contents
- Structured code directories
.gitignore,README,LICENSE,.github- Evidently pull request and issue templates go into the .github folder as well
testsdirectorypyproject.toml.pre-commit-config.yaml- ruff, isort, etc.
requirements.txt- Dependencies also in pyproject.toml but it’s also good to have this file
requirements.inif using pip tools
contributing.md- Instructs on how to contribute to your project — format to submit pull requets, code of conduct, coding standards, etc.
docsdirectory
An underscore
_at the beginning is used to denote private variables in Python.def set_temperature(self, value): if value < -273.15: raise ValueError("Temperature below -273.15 is not possible.") self._temperature = value- You can still access “_temperature” but it’s just meant for internal use by the class and the underscore indicates this
{{warnings::warnings.filterwarnings(‘ignore’)}}
sys.getsizeof(obj)to get the size of an object in memory.
Terms
- classes - code template for creating objects, we can think of it as a blueprint. It describes the possible states and behaviors that every object of a certain type could have.
- object - data structure storing information about the state and behavior of a certain entity and is an instance of a class
- stub file - a file containing a skeleton of the public interface of that Python module, including classes, variables, functions – and most importantly, their types. (Source)
Base
Info method
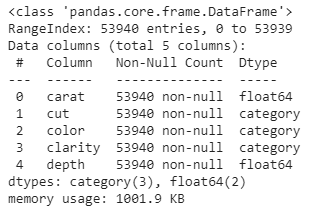
X.info()Remove an object:
delCheck object type
type(): outputs the type of an objectisinstance(): outputs type and inheritance of an object- See article for details on differences
Import Libraries
import logging
import bentoml
from transformers import (
    SpeechT5Processor,
    SpeechT5ForTextToSpeech,
    SpeechT5HifiGan,
    WhisperForConditionalGeneration,
    WhisperProcessor,
)
Fundamentals
Slicing
Format
my_list[start:stop:step]- ** start value is inclusive and the end value is exclusive
1 element and more than 1 element
"Python"[0] # P
"Python"[0:1] # P
"Python"[0:5] # Pytho
illustrates how when using a range, the last element is exclusive
Negative indexing
my_list[0:-1]- Everything but the last object
Skip every second element
my_list = list("Python")
my_list[0:len(my_list):2]
>> ['P', 't', 'o']
start at 0, end at len(my_list), step = 2
Shortcuts
my_list[0:-1] == my_list[:-1] my_list[0:len(my_list):2] == my_list[::2] "Python"[::-1] == "Python"[-1:-7:-1]- Defaults
- 0 for the start value
- len(list) for the stop value
- 1 for the step value
- Defaults for negative step value
- -1 for the start value
- -len(list) - 1 for the stop value
- Defaults
Alias vs new object
b = a # alias b = a[:] # new object- With the alias, changes to a will happen to b as well
Common use cases
Every element but the first and the last one [1:-1] Every element in reverse order [::-1] Every element but the first and the last one in reverse order [-2:0:-1] Every second element but the first and the last one in reverse order [-2:0:-2] Using slice function
sequence = list("Python") my_slice = slice(None, None, 2) # equivalent to [::2] indices = my_slice.indices(len(sequence)) >> (0, 6, 2)- Shows start = 0, stop = 6, step = 2
F-Strings
Misc
- Cheatsheet
- T-Strings (v3.14+)
Output is a template object instead of a string (like F-strings)
Allow a utility to pre-process the interpolations within the template, in whatever way they’d like, before actually making a string.
Example:
name = "World"
template = t"Hello {name}"
template
#> Template(strings=('Hello ', ''), interpolations=(Interpolation('World', 'name', None, ''),))
Parameterize with {}
>> x = 5
>> f"One icecream is worth [{x}]{style='color: #990000'} dollars"
'One icecream is worth 5 dollars'
! - functions
- !r — Shows the string delimiter, calls the repr() method.
- repr’s goal is to be unambiguous and str’s is to be readable. For example, if we suspect a float has a small rounding error, repr will show us while str may not
- !a — Shows the Ascii for the characters.
- !s — Converts the value to a string.
- Guessing this the str() method (see !r for details)
food2brand = "Mcdonalds" food2 = "French fries" f"I like eating {food2brand} {food2!r}" "I like eating Mcdonalds 'French fries'"- !r — Shows the string delimiter, calls the repr() method.
Change format with “:”
>> import datetime
>> date = datetime.datetime.utcnow()
>> f"The date is {date:%m-%Y %d}"
'The date is 02-2022 15'
Formatting with “>” and “<”
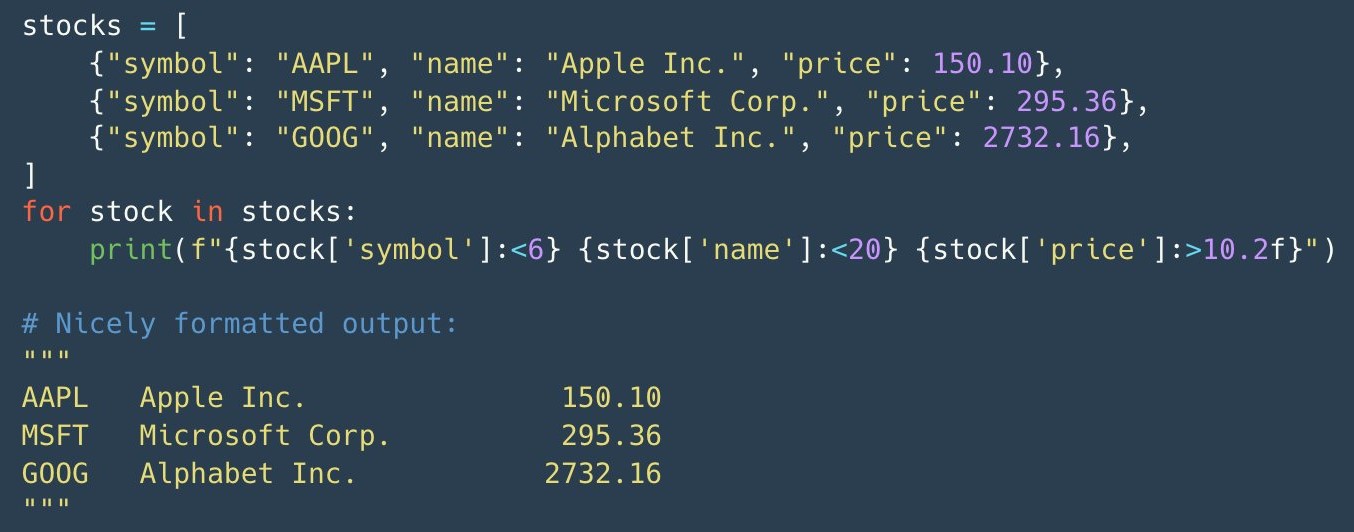
- <6 says width is 6 characters and text starts at the left edge
- >10.2f says width is 10 characters, text starts the right hand edge, and number is rounded to 2 decimal places
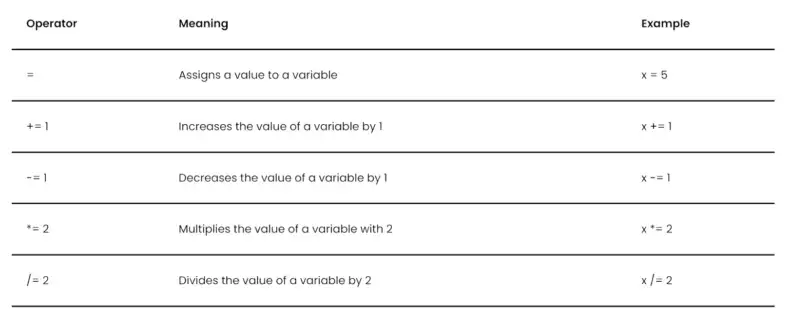
Operators
(docs)
Exponential:
5**3Matrix Multiplication:
X @ bInteger division:
5//3Modulo:
5%3Identity:
isx = 5 y = 3 print("The result for x is y is", x is y) The result for x is y is false- Think you can also use
==here too
- Think you can also use
Logical:
andandorprint("The result for 5 > 3 and 6 > 8 is", 5 > 3 and 6 > 8) print("The result for 5 > 3 or 6 > 8 is", 5 > 3 or 6 > 8) The result for 5 > 3 and 6 > 8 is False The result for 5 > 3 or 6 > 8 is TrueSubset:
inandnot inprint("Is the number 3 in the list [1,2,3]?", 3 in [1,2,3]) Is the number 3 in the list [1,2,3]? True print("Is the number 3 not in the list [1,2,3]?", 3 not in [1,2,3]) Is the number 3 not in the list [1,2,3]? FalseAssignment
Types
- Scalars
Create scalars by subsetting a list
inputs = [1, 0.04, 0.9]
# 1 numeric
rmse = inputs[0] # rmse = 1 and is type 'float'
# multiple numerics
rmse, mape, rsq = inputs
- Tuples
- Lists are mutable and tuples are not
- i.e. we can add or remove elements to a list after we create it but we cannot do such thing to a tuple
- Syntax:
name_of_tuple = (a, b)
- Lists are mutable and tuples are not
- Lists
Create list of objects (e.g. floats)
acc_values = [rmse, mape, rsq]alt method: asterisk-comma notation
*acc_names, = "RMSE", "MAPE", "R-SQ"- asterisk is “unzipping operator”
Make a copy
old_list = [2, 3, 4]
new_list = list(old_list)
- Dictionaries
** if creating a simple dict, more performant to use curly braces **
- Avoid
d = dict(1=1, x='x')
- Avoid
Merge 2 dicts (source)
# old way
merged_dict = {**dict1, **dict2}

# Since 3.9 (less bytecode, so faster in some cases)
merged_dict = dict1 | dict2

# In-Place Updating
dict1 |= dict2
Join 2 dicts -
d.update(d2)- If d and d2 share keys, d2’s values for those keys will be used
Access a value from a key:
sample_dict['key_name']Make a copy
old_dict = {stuff: 2, more_stuff: 3}
new_dict = dict(old_dict)
Convert list of tuples to a dict
acc_dict = dict(acc_list)- zip creates lists of tuples (See Loops >> zip section)
Add key, value pair to a dict
transaction_data['user_address'] = '221b Baker Street, London - UK'
# or
transaction_data.update(user_address='221b Baker Street, London - UK')
Unpack dict into separate tuples for key:value pairs
rmse, mape, rsq = acc_dict.items() rmse ('RMSE', 1)- ** fastest way to iterate over both keys and values in a dict **
- can also use
zipto unpack pairs into a list (see loops >> zip)
Unpack dict into separate lists for keys and values
acc_keys = list(acc_dict.keys()) acc_values = list(acc_dict.values())- ** fastest way to iterate over a dict’s keys or values **
Unpack values from dicts into separate scalars
rmse, mape, rsq = acc_dict.values()
rmse
1
Pull the value for a key (e.g. k) or return the default value -
d.get(k, default)- Default is “None”. I think this can be set with
d.setdefault(k, default)
- Default is “None”. I think this can be set with
Check for specific key (logical)
‘send_currency’ in transaction_data ‘send_currency’ in transaction_data.keys() ‘send_currency’ not in transaction_data.keys()- Like %in% in R
Check for specific value (logical)
‘GBP’ in transaction_data.values()Check for key, value pair
(‘send_currency’, ‘GBP’) in transaction_data.items()Pretty printing of dictionaries
_ = [print(k, ":", f'{v:.1f}') for k,v in acc_dict.items()] RMSE : 1.00 MAPE : 0.04 R-sq : 0.90- for-in loop format (see Loops >> Comprehension)
printreturns “none” for each key:value at the bottom of the output for some reason. Assigning the print statement to a variable fixes it.
defaultdict- Creates a key from a list element and groups the properties into a list of values where the value may also be a dict.
- From {{collections}}
- Also see
- Pybites video
- JSON >> Python >> Example: Parse Nested JSON into a dataframe
- Sets
- If performing set logic, always more performant to use sets instead of dicts or lists

- If using numpy/pandas, using the
.unique()syntax is more efficient for arrays/series’ with numeric values - If using strings, it’s more efficient to use
list(set(my_array))
- If using numpy/pandas, using the
- If performing set logic, always more performant to use sets instead of dicts or lists
- Strings
Operators
Operator Description
%d Signed decimal integer
%u unsigned decimal integer
%c Character
%s String
%f Floating-point real number
Example
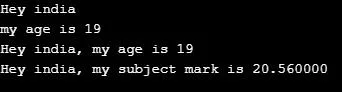
name = "india"
age = 19
marks = 20.56
string1 = 'Hey %s' % (name)
print(string1)
string2 = 'my age is %d' % (age)
print(string2)
string3= 'Hey %s, my age is %d' % (name, age)
print(string3)
string3= 'Hey %s, my subject mark is %f' % (name, marks)
print(string3)
uv
Misc
Integration Guides: Docker, Jupyter, marimo, pre-commit, GitHub Actions, GitLab CI/CD, alternative package indexes, PyTorch, FastAPI, AWS Lambda
Libraries
- uv-secure - Scan your uv.lock file for dependencies with known vulnerabilities.
- Set optional code maintainability thresholds to flag dependencies whose release is too old or that have been marked as yanked on PyPi.
- uv-secure - Scan your uv.lock file for dependencies with known vulnerabilities.
Alternatives
Benchmark (source)
Tool run with single CPU core Cache Wallclock time CPU time pip installCold 9.3s 6.2s pip installWarm 6.2s 5.6s uv pip install --compile-bytecodeCold 6.0s 4.9s uv pip install --compile-bytecodeWarm 4.1s 4.1s - Pandas and MatPlotLib were installed (14 total packages)
- uv is faster when testing with the same config, but not supernaturally faster than pip.
- If you’re installing a lot of dependencies, then using uv’s ability to utilize multiple CPUs would likely increase the advantage.
Package Manager
- Written in Rust
- By writing it in Rust, it removes by design half of the bootstrapping problems cursing Python tooling. To install uv, you don’t need to worry about which Python you use, where is your venv, and how you are going to deal with the PATH.
- Drop-In replacement for common pip workflows
- Downloads packages in parallel.
- Disables the bytecode compilation by default, having it be opt-in as opposed to pip’s opt-out.
- Written in Rust
Environment Manager
- Finds direct dependencies from a pyproject.toml file, create a cross-platform lock file, add & remove deps from the conf and sync the whole project instantly. This turns it into a serious alternative to pip-tools, Poetry, or Pipenv.
- Can install Python itself, on Windows, Mac and Linux. This makes it a replacement for Pyflow, Pyenv or Rye.
- Can run scripts with inline dependencies, like hatch. This means stand-alone scripts can use Pypi deps without worries.
- Provides uvx, a pipx equivalent.
Operations
Update uv:
uv self updateInstalling one or more specific versions:
uv python install <version, constraints, etc.>- e.g.
uv python install pypy3.8 - To uninstall:
uv python uninstall 3.8
- e.g.
List all available installations:
uv python listReturn path of python executables:
uv python find 3.8- Returns the path of python 3.8
Start project:
- Create directory and add project files:
uv init hello-world- Or add project files in the working directory:
uv init - Creates a
pyproject.toml, a git repo (with Python-specific.gitignore), aREADME.md,.python-versionand amain.pyfiles by default
- Or add project files in the working directory:
- Add a dependency:
uv add requests- Creates
.venvanduv.lockfiles - Adds requests library to the dependencies section in
pyproject.tomland inrenv.lock - The
renv.lockis cross platform, so you can dev on windows and deploy on linux
- Creates
- Create directory and add project files:
Add and Remove Dependencies:
uv add requests uv add 'requests==2.31.0' # Add a git dependency uv add git+https://github.com/psf/requests uv remove requests # add deps from a req.txt to lock file cat requirements.txt | xargs -n 1 uv add- Adds dependencies to your pyproject.toml
- Updates the lockfile and project environment
List dependencies in lock file
uv tree --depth=1
#> sandbox v0.1.0 (virtual environment)
#> ├── numpy v2.3.5
#> ├── polars v1.35.2
#> ├── scikit-learn v1.7.2
#> └── statsmodels v0.14.5

uv tree
#> sandbox v0.1.0
#> ├── numpy v2.3.5
#> ├── polars v1.35.2
#> │   └── polars-runtime-32 v1.35.2
#> ├── scikit-learn v1.7.2
#> │   ├── joblib v1.5.2
#> │   ├── numpy v2.3.5
#> │   ├── scipy v1.16.3
#> │   │   └── numpy v2.3.5
#> │   └── threadpoolctl v3.6.0
#> └── statsmodels v0.14.5
#>     ├── numpy v2.3.5
#>     ├── packaging v25.0
#>     ├── pandas v2.3.3
#>     │   ├── numpy v2.3.5
#>     │   ├── python-dateutil v2.9.0.post0
#>     │   │   └── six v1.17.0
#>     │   ├── pytz v2025.2
#>     │   └── tzdata v2025.2
#>     ├── patsy v1.0.2
#>     │   └── numpy v2.3.5
#>     └── scipy v1.16.3 (*)
#> (*) Package tree already displayed

uv pip list
#> Package           Version
#> ----------------- -----------
#> joblib            1.5.2
#> numpy             2.3.5
#> packaging         25.0
#> pandas            2.3.3
#> patsy             1.0.2
#> pip               25.3
#> polars            1.35.2
#> polars-runtime-32 1.35.2
#> python-dateutil   2.9.0.post0
#> pytz              2025.2
#> scikit-learn      1.7.2
#> scipy             1.16.3
#> six               1.17.0
#> statsmodels       0.14.5
#> threadpoolctl     3.6.0
#> tzdata            2025.2
Update a library:
uv lock --upgrade-package requests- It will attempt to update the specified package to the latest compatible version, while keeping the rest of the lockfile intact.
- To a specific version:
uv lock --upgrade-package requests==2.31.0
Spin up a quick REPL with a temporary python version and packages
- e.g
uv run --python 3.12 --with pandas python
- e.g
Create a package from your project:
uv build- Builds a binary
.whlfile
- Builds a binary
Initialize a package project:
uv init --package lifeweeksProject Structure
├── README.md
├── pyproject.toml
└── src
    └── lifeweeks
        └── __init__.py
See uv, part 2: building and publishing packages for details on how to publish to PyPI
Scripts
Run a script or command:
uv run example.py- Runs any command/script in the venv automatically, even if it’s not activated
- Run jupyter in the current project:
uv run --with jupyter jupyter notebook- Doesn’t add jupyter and its dependencies to the project
- Run with a specific version of Python:
uv run --python 3.9.21 main.py - Run with a package(s) that you’ve added to a script (i.e.
import rich) but haven’t added as a dependency:uv run --with rich --with requests --python 3.9 main.py
–script
Add this flag to other commands for script-specific operations
uv addanduv removeto add and remove dependenciesuv lockanduv syncto create and synchronize with the script’s lock fileuv treeto print the script’s transitive dependenciesuv exportto export the script’s dependencies to another format, such asrequirements.txtExample:
uv add(source)You want to add a dependency to
foo.py#!/usr/bin/env -s uv run print("your code here")After running
uv add --script foo.py numpy, your script becomes#!/usr/bin/env -s uv run # /// script # requires-python = ">=3.12" # dependencies = [ # "numpy", # ] # /// print("your code here")
Install and Run a Tool from CLI
Notes from uv, part 1: running scripts and tools
From PyPI
$ uvx vcferr --help
#> Installed 3 packages in 5ms
#>
#> Usage: vcferr [OPTIONS] <input_vcf>
#>
#> Options:
#>   -s, --sample TEXT        ID of sample in VCF file
#>                            to be simulated[required]
#>   -o, --output_vcf TEXT    Output VCF file containing simulated
#>                            genotypes ex:example.sim.vcf.gz
#>   ...(truncated)...
#>   -a, --seed INTEGER       Random number seed
#>   --help                   Show this message and exit.
From Github
$ uvx --from \
  git+https://github.com/stephenturner/caffeinated \
  caffeinated -c 200 -s 0600 -b 2000

#>  Updated https://github.com/stephenturner/caffeinated (762d601)
#>    Built caffeinated @ git+https://github.com/stephenturner/caffeinated@762d60111ac84f4af5031141ea29232d26659f9f
#> Installed 2 packages in 1ms
#>
#> You would have 39.7mg of caffeine in your system
#> if you went to bed at 8:00pm (in 14.0 hours).
#> That's like having 44% of a cup of coffee before bed.
Run Voila on a Jupyter Notebook
uvx --with jupyter,numpy,bqplot voila bqplot.ipynb- Since {voila} requires jupyter and the packages imported in the notebook to create the web app, –with is required along with extra dependencies.
Example: Basic
$ cd /tmp $ curl -LsSf https://astral.sh/uv/install.sh | sh $ uv init -p "<3.8,>=3.7" # forcing 3.7 Initialized project `tmp` $ uv run hello.py Using Python 3.7.9 Creating virtualenv at: .venv Hello from tmp!- Install uv globally.
- Creates a project with a
hello_world.pyandpyproject.tomlfiles. - Install Python with the required version.
- Create a venv with this Python.
- Activate the venv.
- Run the script.
pip
Looks for packages on https://pypi.org, downloads, and installs it
See Dependencies for pip extensions
Misc
- If you installed python using the app-store, replace
pythonwithpython3. - Don’t use sudo to install libraries, since it will install things outside of the virtual environment.
- Nor should you use “–user”, since it’s made to install things outside of the virtual environment.
- Don’t mix pip, venv and Anaconda. Avoid Anaconda if you can. If you have to use Anaconda, don’t use pip and venv. Limit yourself to Anaconda tools.
- If you get SSL errors (common if you are in a hotel or a company network) use the –trusted-host pypi.org –trusted-host files.pythonhosted.org options with pip to work around the problem.
- e.g.
python -m pip install pendulum --trusted-host pypi.org --trusted-host files.pythonhosted.org
- e.g.
- If you are behind a corporate proxy that requires authentication (common if you are in a company network), you can use the –proxy option with pip to give the proxy address and your credentials.
- e.g.
python -m pip install pendulum --proxy http://your_username:yourpassword@proxy_address - It also works with the https_proxy environment variables
- e.g.
pip config set global.require-virtualenv Truewill only allow pip to install packages while a virtual environment is activated.- Probably needs to be set back to False when updating pip.
- May become the default in Python 3.13
- Optimizations
- Notes from Faster pip installs: caching, bytecode compilation, and uv
- Use Wheel files (.whl)
- Make sure you’re using the latest version of pip before installing dependencies. Binary wheels sometimes require newer versions of pip than the one packaged by default by your current Python.
- Don’t use Alpine Linux
- Stick to Linux distributions that use glibc, e.g Debian/Ubuntu/RedHat/etc.. Standard Linux wheels require glibc, but Alpine uses the musl C library.
- Wheels for musl-based distributions like Alpine are available for many projects, but they’re less common.
- Otherwise, if there’s no wheel, you’ll have to install from source which means a .tar.gz and potentially compiling some C code.
- Stick to Linux distributions that use glibc, e.g Debian/Ubuntu/RedHat/etc.. Standard Linux wheels require glibc, but Alpine uses the musl C library.
- Caching
- Have a warm cache
- When a package manager like pip downloads a package, it will typically store a copy locally in a cache: some tool-specific directory on the filesystem. That means the next time you install that package, the package manager can check if it already has a cached copy, and if so just install that. This saves download times. If the package is already in the cache, we say the cache is “warm.”
- Most CI systems will have some way to store a cache directory at the end of the run, and then load it at the beginning of the next run.
- Storing and loading the cache also takes time, so if you have many or large dependencies try w/cache and w/o cache and see which is faster.
- Have a warm cache
- Disable bytecode compilation
- After packages are unpacked on to the filesystem, package managers sometimes do one final step: they compile the
.pysource files into.pycbytecode files, and store them in__pycache__directories. - This is an optimization to make loading Python code faster on startup (i.e.
import). - Any module you import will still need to be compiled into a
.pyc, it’s just that the work will happen when your program runs, instead of at package installation time. So if you’re importing all or most modules, overall you might not save any time at all, you’ve just moved the work to a different place. - This can be worthwhile when you’re testing a setup as you might be installing many third-party packages for integration testing, but only using a small amount of those libraries’ code.
- After packages are unpacked on to the filesystem, package managers sometimes do one final step: they compile the
- If you installed python using the app-store, replace
Install library
$ python -m pip install <library_name>

# inside ipython or a colab notebook, "!" signifies a shell command
!pip install <library_name>
Install library from github
python -m pip install git+https://github.com/bbalasub1/glmnet_python.git@1.0- “@1.0” is the version number
Uninstall library
$ python -m pip uninstall <library_name>- Won’t uninstall the dependencies of this library.
- If you wish to also uninstall the unused dependencies as well, take a look at
pip-autoremove
Remove all packages in environment
$ python -m pip uninstall -y -r <(pip freeze)Remove all packages in environment but write the names of the packages to a requirements.txt file first
$ python -m pip freeze > requirements.txt && python3 -m pip uninstall -r requirements.txt -yInstall requirements.txt
$ python -m pip install -r requirements.txtWrite names of all the packages in your environment to a requirement.txt file
$ python -m pip freeze > requirements.txt- Writes the specific version of the packages that you have installed in your environment (e.g. pandas==1.0.0)
- This may not be what you always want, so you’ll need to manually change to just the library name in that case (e.g. pandas)
- Only aware of the packages installed using the pip install command
- i.e. any packages installed using a different approach such as peotry, setuptools, condaetc. won’t be included in the final requirements.txt file.
- Does not account for dependency versioning conflicts
- Saves all packages in the environment including those that are not relevent to the project
- If you are not using a virtual environment, pip freeze generates a requirement file containing all the libraries in including those beyond the scope of your project.
- Writes the specific version of the packages that you have installed in your environment (e.g. pandas==1.0.0)
List your installed libraries
$ python -m pip listSee if you have a particular library installed
$ python -m pip list | grep <library_name>Get library info (name, version, summary, license, dependencies and other)
$ python -m pip show <library_name>Check that all installed packages are compatible
$ python -m pip checkUpdate package
$ python -m pip install package_name --upgradeSearch for PyPI libraries (pip source for libraries)
$ python -m pip search <search_term>- returns all libraries matching search term
Download a package without installing it
python -m pip download <library name>It will download the package and all its dependencies in the current directory (the files, called, wheels, have a .whl extension).
You can then install them offline by doing
python -m pip installon the wheels.
Build Wheel archives for the libraries and dependencies in your environment
$ python -m pip wheel- I think these are binaries, so they don’t need compiled if installed in a future environment
- Real Python Tutorial
Manage configuration
$ python -m pip config <action name>Actions: edit, get, list, set or unset
Example
$ python -m pip config set global.index-url https://your.global.index
Display debug information specific to pip
$ python -m pip debug
Anaconda
Check configuration of current environment
conda list- Shows python version used, package names installed and their versions
Install packages
conda install <package1> <package2>Install a package from a specific channel
conda install <package_name> -c <channel_name> -y # Short form
conda install <package_name> --channel <channel_name> -y # Long form
Package installation channels (some packages not available in default channel)
Check current channels
conda config --show channels- The order in which these channels are displayed shows the channel priority.
- When a package is installed, anaconda will the check the channel at the top of list first then work it’s way down
- The order in which these channels are displayed shows the channel priority.
Add a channel
conda config --add channels conda-forge- Adds “conda-forge” to list of available channels
Remove a channel
conda config --remove channels conda-forge- Removes the “conda-forge” channel
Environments
- Misc
- When you’re in a virtual environment
Anytime you use the “python” command while your virtual environment is activated, it will be only the one from this env.
If you start a Python shell now, it will see only the things in the current directory, and the things installed in the virtual environment.
If you run a script, it will see only the things in the current directory, and the things installed in the virtual environment.
If you run a command, the command will be taken from the virtual environment.
And they will only use exactly the version of Python of the virtual environment.
- Store environment files with project
- Breakage
- You cannot move a virtual environment, it will stop working. Create a “requirements.txt” file, delete the virtual environment and create a new one.
- Don’t rename a directory containing a virtual environment. Or if you do, prepare yourself to create a “requirements.txt” file, delete the virtual environment and create a new one.
- If you change the Python used in the virtual environment, such as when uninstalling it, it will stop working.
- Create one big virtual environment for all small scripts.
- If you make a lot of venv, you may be tempted to install everything at the system level for convenience. After all, it’s a bore to create and activate a virtual environment each time you want to write a five liner. A good balance is one single virtual environment you use for all things quick and dirty.
- Create several virtual environments per versions of python if your project needs to support several versions. You may need several requirements.txt files as well, one for each env.
- Recommendations for a stable dependency environment for your project (article)
- Don’t install the latest major version of Python
- Maximum: 1 version under the latest version
- Minimum: 4 versions under the latest version (e.g. latest = 3.11, min = 3.7)
- Use only the python.org installer on Windows and Mac, or official repositories on Linux.
- Never install or run anything outside of a virtual environment
- Limit yourself to the basics: “pip” and “venv”
- If you run a command, use “-m”
It lets you run any importable Python module, no matter where you are. Because most commands are Python modules, we can use this to say, “run the module X of this particular python”.
There is currently no way for you to run any python command reliably without “-m”.
Examples:
# Don't do :
pip install
# Do:
python -m pip install

# Don't do :
black
# Do:
python -m black

# Don't do :
jupyter notebook
# Do:
python -m jupyter notebook
- When creating a virtual environment, be explicit about which Python you use
- Get current python versions installed:
py --list-paths(windows)
- Get current python versions installed:
- Don’t install the latest major version of Python
- When you’re in a virtual environment
pyenv
- Just a simple Python version manager — think {rig}
- {{pyenv}}, {{pyenv-win}}
- Set-up in RStudio (article)
- Compiles Python under the hood when you install it. But compiling can fail in a thousand ways
pyenv install --list: To see what python versions are available to installpyenv install <version number>: To install a specific versionpyenv versions: To see what python versions are installed on your systempyenv global <version number>: The set one python version as a global defaultpyenv local <version number>: The set a python version to be used within a specific directory/project\
pdm
- Docs
- Package and dependency manager similar to npm. Doesn’t require virtual environments.
- Features: auto-updating pyproject.toml, isolating dependencies from dependencies-of-dependencies, active development and error handling
pvenv
- Easy python virtual environment management
- Basically just sets up nice aliases for venv commands
- Docs
- venv activate (aliased to
avenv) to activate a virtual environment - venv deactivate (aliased to
dvenv) to deactivate a virtual environment - venv list (aliased to
lsvenv) to list all the virtual environments - venv make (aliased to
mkvenv) to create a new virtual environment - venv rm (aliased to
rmvenv) to remove a virtual environment
venv
- Misc
- Create
- Windows:
python3 -<py version> -m venv <env name>-m venvtells python to run the virtual environment module, venv- Make sure you’re in your projects directory
- Remember to add “<env_name>/” to .gitignore
- Mac/Linux:
python3.8 -m venv <env name>- Where the python version is 3.8 and the environment name is “.venv”
- Mac and Linux hide folders with names that have preceding “.” by default, so make sure you have “display hiddent folders” activated or you won’t see it.
- Naming Environments
- Name your environment directory “.venv”, because:
- Some editors check for this name and automatically load it.
- It contains “venv”, so it’s explicit.
- It has a dot, so it’s hidden on Linux.
- If you have more than one environment directory, use a suffix to distinguish them.
- e.g. A project that must work with two different versions of Python (3.9 and 3.10), I will have a “.venv39” and a “.venv310”
- Naming enviroments for misc uses
- “.venv_test”: located in a personal directory to install new tools you want to play with. It’s disposable, and often broken, so you can delete it and recreate it regularly.
- “.venv_scripts”: Used for all the small scripts. You don’t want to create one virtual environment for each script, so centralize everything. It’s better than installing outside of a virtual environment, but is not a big constraint.
- Name your environment directory “.venv”, because:
- Windows:
- Activate
Example:
source venv/bin/activate # Mac or Linux venv\Scripts\activate # Windows >> (<env_name>) $- Prompt should change if the environment is activated
- All
pipinstalled packages will now be installed into the “<env_name>/lib/python3.9/site-packages” directory
- After that, you can use
python -m pip installto install packages. - Deactivate:
deactivate - Remove a venv:
rm -rf <env name>in the project folder with the env_name folder in it. - Reproducing environment
- Done using
requirements.txt(see pip section for details on writing and installing)- I don’t think the python version is included, so that will need to communicated manually
- Done using
Anaconda
List environments
conda env list # method 1 conda info --envs # method 2- default environment is called “base”
- Active environment will be in parentheses
- Active environment will be the one in the list with an asterix
Create a new conda environment
conda create -n <env name>
conda activate <env name>
Create a new conda environment with a specific python version
conda create -n py310 python=3.10 conda activate py310 conda install jupyter jupyterlab jupyter lab- Also install and launch jupyter lab
Create an environment from a yaml file
conda env create -f environment.yml # Short form
conda env create --file environment.yml # Long form
Remove an environment
conda deactivate <env_name> # Need to deactivate the environment first conda env remove -n <env_name>- Should also delete environment folders (
conda env listshows path to folders)
- Should also delete environment folders (
Clone an existing environment
conda create -n testclone --clone test # Short form conda create --name testclone --clone test # Long form- “testclone” is a copy of “test”
Activate an environment
conda activate <env_name>Activate environment with reticulate in R
reticulate::use_python("/usr/local/bin/python")
reticulate::use_condaenv("<env name>", "/home/jtimm/anaconda3/bin/conda")
Deactivate an environment
conda activate # Option 1: activates base
conda deactivate test # Option 2
Export the specifications of the current environment into a YAML file into the current directory
conda env export > environment.yml # Option 1 conda env export -f environment.yml # Option 2Example: Conda workflow
Create an environment that uses a specific python version
- Without a specified python version, the environment will use the same version as “base”
conda create -n anothertest python=3.9.7 -y- -n is the name flag and “anothertest” is the name of the environment
- Uses Python 3.9.7
- Without the -y flag, there’d be a prompt you’d have to answer “yes” to
Activate the environment
conda activate anothertestInstall packages
Installing packages one at time can lead to dependency conflicts.
Conda’s official documentation recommends to install all packages at the same time so that the dependency conflicts are resolved
conda install "numpy>=1.11" nltk==3.6.2 jupyter -y # install specific versions
conda install numpy nltk jupyter -y # install all latest versions
Do work and deactivate environment
conda deactivate anothertest
Example Raschka workflow
# create & activate
conda create  --prefix ~/code/myproj python=3.8
conda activate ~/code/myproj
# export env
conda env export > myproj.yml
# create new env from yaml
conda env create --file myproj.yml --prefix ~/code/myproj2
Poetry
Docs (like renv)
Apparently buggy (article)
pip’s dependency resolver is more flexible and won’t die on you if the package specifies bad metadata, while poetry’s strictness may mean you can’t install some packages at all.
Create project
poetry new <project-dir-name>- automatically creates a directory for your project with a skeleton
- “pyproject.toml” maintains dependencies for the project with the following sections:
- tool.poetry provides an area to capture information about your project such as the name, version and author(s).
- tool.poetry.dependencies lists all dependencies for your project.
- tool.poetry.dev-dependencies lists dependencies your project needs for development that should not be present in any version deployed to a production environment.
- build-system references the fact that Poetry has been used to manage the project.
Add library and create lock file:
poetry add <library name>- When the first library is added, a “poetry.lock” file wil be generated
Activate environment:
poetry shell- Deactivate environment:
exit
- Deactivate environment:
Run script:
poetry run python my_script.pyPackage the project:
poetry build- Creates tar.gz and wheel files (.whl) in “dist” dir
Example: poetry workflow (+pyenv, virtualenv)
# Create a virtual environment called "my-new-project" # using Python 3.8.8 pyenv virtualenv 3.8.8 my-new-project # Activate the virtual environment pyenv activate my-new-project{{pyenv}} - For managing the exact version of Python and activating the environment
Name your package the same name as the directory which is the same name as the virtual environment.
- Dashes for the latter two and underscores for the package
Intitialize the project and add packages (similar to renv)
bash poetry init poetry add numpyReinstall dependencies
# navigate to my project directory and run
poetry install
Turn off virtualenv management
# right after installing poetry, run: poetry config virtualenvs.create false- Default poetry behavior is that it will manage your virtual environments for you. This may not be desirable because:
- Can’t just run a script from the command line. Instead, have to run
poetry run my-script- Awkward when you want to dockerize your code
- Enforces a virtual environment management framework on everybody in a shared codebase
- Your Makefile now needs to know about poetry
- Can’t just run a script from the command line. Instead, have to run
- Default poetry behavior is that it will manage your virtual environments for you. This may not be desirable because:
Dependencies
Misc
- After mastering pip, {{pip-tools}} is recommended.
Get a complete list of dependencies (e.g. dependencies of dependencies) with {{deptree}}
deptree # output Flask==2.2.2 # flask Werkzeug==2.2.2 # Werkzeug>=2.2.2 MarkupSafe==2.1.1 # MarkupSafe>=2.1.1 Jinja2==3.1.2 # Jinja2>=3.0 MarkupSafe==2.1.1 # MarkupSafe>=2.0 itsdangerous==2.1.2 # itsdangerous>=2.0 click==8.1.3 # click>=8.0 # deptree and pip trees- Flask depends on Werkzeug which depends on MarkupSafe
- Werkzeug and MarkupSafe qualify as transitive dependencies for this project
- Commented part on the right is the compatible range
- Flask depends on Werkzeug which depends on MarkupSafe
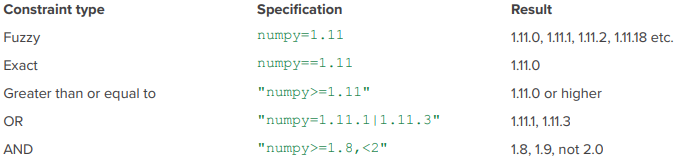
requirements.txt format
Example: With and without versions
# comment
pandas==1.0.0
pyspark
Example: Using versions and hashes
pandas==1.5.3 \
    --hash=sha256:2d7a9d... \
    --hash=sha256:4d8e6a...
matplotlib==3.7.2 \
    --hash=sha256:8f28ba... \
    --hash=sha256:3c1a7c...
Hashes can be generated using tools like
pip hashorpip-compilefrompip-tools.A package may have multiple hash depending on the OS, file type (e.g. .whl or .tar.gz), or package builds
- e.g. a .whl file for Linux might differ from one for Windows because of differences in compiled C extensions.
Why?
- Security: By including a hash, you ensure that the downloaded package is exactly the one intended. This helps prevent supply chain attacks where an attacker could replace a legitimate package with a malicious one.
- Integrity: Verifies that the package hasn’t been corrupted during download.
pip: write names of all the packages in your environment to a requirement.txt file
$ python -m pip freeze > requirements.txt- See pip section for issues with this method
-
After learning pip, {{pip-tools}} is recommended.
Creates a
requirements.txtwith “pinned” dependencies (i.e. with versions) and shows how those packages depend on each other by naming the package in a comment.Less extensive dependency management than something like poetry
Workflow
- Create and activation virtual environment
- Install pip-tools in venv
- Open requirements file in vim:
vi requirements.in - List 1 package per row without any pinning (i.e. versions), save, and exit vim
- Compile requirements file:
pip-compile - requirements.txt file is generated with package pinning and dependencies in the comments
- Install requirements:
pip install -r requirements.txt
-
For dependencies that you use everywhere
A tool for installing Python CLI utilities that gives them their own hidden virtual environment for their dependencies
Adds the tool itself to your PATH - so you can install stuff without worrying about it breaking anything else
Install
pipx install datasetteUpdate package and dependencies
pipx upgrade datasetteList packages
pipx list
{{pipreqs}}
Scans all the python files (.py) in your project, then generates the requirements.txt file based on the import statements in each python file of the project
Set-up:
pip install pipreqsGenerate requirements.txt file:
pipreqs /<your_project_root_path>/Update requirements.txt:
pipreqs --force /<your_project_root_path>/Ignore the libraries of some python files from a specific subfolder
pipreqs /<your_project_root_path>/ --ignore /<your_project_root_path>/folder_to_ignore/
-
- Notes from:
- Creates and nests multiple requirement files
- e.g. Able to keep dev environment from production environment separate
- Autoresolution of cross-requirement file conflicts
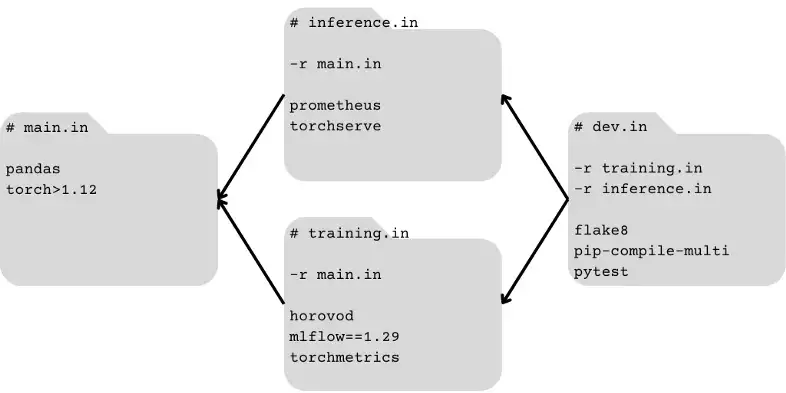
- Dependency DAG (how all requirement files are connected) must have exactly one “sink” node
- Organize your most ubiquitous dependencies into a single “core” set of dependencies that all other nodes require (a source node), and all of your development dependencies in a node that requires all others (directly or indirectly) require (a sink).
- Simplifies and allows use of autoresolution functionality
- Example: DAG (directionality of the arrows is opposite compared to library docs)
Loading/Saving
Misc
- {{pickle}} needs custom class(es) to be defined in another module/file and then imported. Otherwise, PicklingError will be raised.
File paths
- Misc
- {{pathlib}} is recommended
- {{os}}
Get current working directory:
os.getcwd()List all files and directories in working directory:
os.listdir()List all files and directories from a subdirectory:
os.listdir(os.getcwd()+'\\01_Main_Directory')Using
os.walk(): gathers paths, folders, and files- Paths

path = os.getcwd()+'\\01_Main_Directory' for folder_path, folders, files in os.walk(path): print(folder_path)- Paths
Folders

- Similar code, just replace
print(folder_path)withprint(folders)
- Similar code, just replace
Files

- {{glob}}
Get a file path string
import glob
path = os.getcwd()+'\\01_Main_Directory'
for filepath in glob.glob(path):
    print(filepath)
# C:\Users\Suraj\Challenges\01_Main_Directory
List all files and subdirectories from a path
path = os.getcwd()+'\\01_Main_Directory\\*' for filepath in glob.glob(path): print(filepath)- Note the * wildcard
List all files and subdirectories with a “1” in the name
path = os.getcwd()+'\\01_Main_Directory\\*1.*'
for filepath in glob.glob(path):
    print(filepath)
Get a list of csv file paths from a directory:
all_files = glob.glob("C:/Users/path/to/dir/*.csv")- Note that you don’t need a loop to save to an object
List all files and subdirectories and files in those subdirectories
path = os.getcwd()+'\\01_Main_Directory\\**\\*.txt' for filepath in glob.glob(path, recursive=True): print(filepath) #Output C:\Users\Suraj\Challenges\01_Main_Directory\ABCD_1.txt C:\Users\Suraj\Challenges\01_Main_Directory\ABCD_2.txt C:\Users\Suraj\Challenges\01_Main_Directory\ABCD_3.txt C:\Users\Suraj\Challenges\01_Main_Directory\ABCD_4.txt C:\Users\Suraj\Challenges\01_Main_Directory\ABCD_5.txt C:\Users\Suraj\Challenges\01_Main_Directory\Sub_Dictionary_1\File_1_in_SubDict_1.txt C:\Users\Suraj\Challenges\01_Main_Directory\Sub_Dictionary_1\File_2_in_SubDict_1.txt C:\Users\Suraj\Challenges\01_Main_Directory\Sub_Dictionary_2\File_1_in_SubDict_2.txt C:\Users\Suraj\Challenges\01_Main_Directory\Sub_Dictionary_2\File_2_in_SubDict_2.txt- Components: “**” and “recursive=True”
- {{pathlib}}
Provides a single Path class with a range of methods (instead of separate functions) that can be used to perform various operations on a path.
Create a path object for a directory
from pathlib import Path
path = Path('origin/data/for_arli')
Check if a folder or a file is available in a given path
if path.exists(): print(f"[{path}]{style='color: #990000'} exists.") if path.is_file(): print(f"[{path}]{style='color: #990000'} is a file.") elif path.is_dir(): print(f"[{path}]{style='color: #990000'} is a directory.") else: raise ValueError(f"[{path}]{style='color: #990000'} does not exists")- Checks if the path ‘origin/data/for_arli’ exists
- if it does, it will check whether it is a file or a directory.
- If the path does not exist, it will print a raise an Error indicating that the path does not exist.
- Checks if the path ‘origin/data/for_arli’ exists
List all files/folders in a path
for f in path.iterdir(): print(f)- Use it in combination with the previous
is_dir()andis_file()methods to list either files or directories.
- Use it in combination with the previous
Delete files/folders in a path
for f in path.iterdir(): f.unlink() path.rmdir()unlinkdeletes each file in the pathrmdirdeletes the directory.- directory must be empty
Create a sequence of directories
# existing directory: D:\scripts\myfolder p = Path("D:\scripts\myfolder\logs\newfolder") p.mkdir(parents=True, exist_ok=True)- Create path object with desired sequence of directories (e.g. logs\newfolder)
mkdirwith parents=True creates the sequence of directories- W/exist_ok=True no error with occur if the directory already exists
Rename directory:
path.rename('origin/data/new_name')Concatenate a path with string
path = Path("/origin/data/for_arli") # Join another path to the original path new_path = path.joinpath("la") print(new_path) # prints 'origin/data/for_arli/bla'- It also handles the join between two Path objects
Directory stats
print(path.stat()) # print statistics print(path.owner()) # print owner- e.g. creation time, modification time, etc.
Write to a file
# Open a file for writing path = Path('origin/data/for_arli/example.txt') with path.open(mode='w') as f: # Write to the file f.write('Hello, World!')- You do not need to create manually example.txt.
Read a file
path = Path('example.txt')
with path.open(mode='r') as f:
    # Read from the file
    contents = f.read()
    print(contents) # Output: Hello World!
Models
Saving and Loading an estimator as a binary using {{joblib}} (aside: pipelines are estimators)
import joblib
#saving the pipeline into a binary file
joblib.dump(pipe, 'wine_pipeline.bin')
#loading the saved pipeline from a binary file
pipe = joblib.load('wine_pipeline.bin')
Saving and loading a trained model as a pickle file
import pickle # open file connection pickle_file = open('model.pkl', 'ab') # save the model pickle.dump(model_obj, pickle_file) # close file connection pickle_file.close() # Open conn and save test_dict = {"Hello": "World!"} with open("test.pickle", "wb") as outfile: # "wb" argument opens the file in binary mode pickle.dump(test_dict, outfile) # open file connection pickle_file = open('model.pkl', 'rb') # load saved model model = pickle.load(pickle_file) # open conn and load # Deserialization with open("test.pickle", "rb") as infile: test_dict_reconstructed = pickle.load(infile)- Can serialize almost everything including classes and functions
Environment Variables
- {{os}}
Check existence
env_var_exists = 'ENV' in os.environ
# or
env_var_exists = os.environ.has_key('ENV')
List environment variables:
print(os.environ)Loading
import os
# Errors when not present
env_var = os.environ['ENV'] # where ENV is the name of the environment variable
# Returns None when not present
env_var = os.environ.get('ENV', 'DEFAULT_VALUE') # using default value is optional
Set/Export or overwrite
os.environ['ENV'] = 'dev'Load or create if not present
try:
    env_var = os.environ['ENV']
except KeyError:
    os.environ['ENV'] = 'dev'
Delete
if 'ENV' in os.environ:
    del os.environ['ENV']
- {{python-decouple}}
Access environment variables from whatever environment it is running in.
Create a .env file in the project root directory:
touch .envOpen .env in nano text editor:
nano .env- Nano text editor is pre-installed on macOS and most Linux distros
- Check if installed/version:
nano --version - Basic usage tutorial
Add environment variables to file
USER=alex KEY=hfy92kadHgkk29fahjsu3j922v9sjwaucahf- Save: Ctrl+o
- Exit: Ctrl+x
* Add .env to your .gitignore file *
Access
from decouple import config
API_USERNAME = config('USER')
API_KEY = config('KEY')
- {{python-dotenv}}
- Reads .env files
- Probably more popular than {{python-decouple}}
- Has a companion R package, {dotenv}, so .env files can be used in projects that use both R and Python.
Functions
- Misc
Benchmarking a function
Using IPython function
%time dat['col1001'] = some_function(dat['col1'], dat['col2'], dat['col3'])%%timeprints the wall time for the entire cell whereas%timegives you the time for first line only
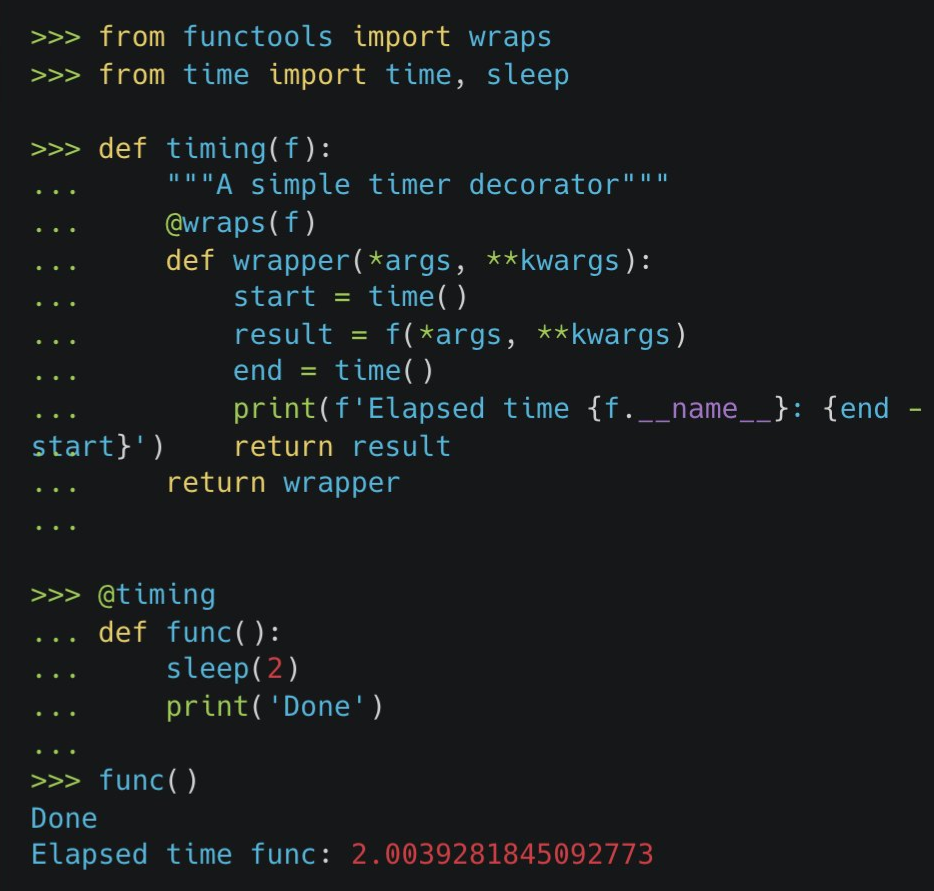
Using a decorator
Assigning functions based on arg type
def process_data(data): if isinstance(data, dict): process_dict(data) else: process_list(data) def process_dict(data: dict): print("Dict is processed") def process_list(data: list): print("List is processed")- Assigns data to a particular function depending on whether it’s a dict or a list
isinstancechecks that the passed argument is of the proper type or a subclass
Wrapping functions
from functools import partial get_count_df = partial(get_count, df=df)- Wraps function to make df the default value for df arg
Documentation
- Functions should at least include docstrings and type hinting
- Docstrings
Types: Google-style, Numpydoc, reStructured Text, EpyTex
Information to include
- Function description, arg description, return value description, Description of errors, Optional extra notes or examples of usage.
Access functions docstring:
print(func_name.__doc__)For large docstrings
import inspect
print(inspect.getdoc(func_name))
Example: Google-style
def send_request(key: str, lat: float = 0, lon: float = 0): """Send a request to Climacell Weather API to get weather info based on lat/lon. Climacell API provides realtime weather information which can be accessed using their 'Realtime Endpoint'. Args: key (str): an API key with length of 32 chars. lat (float, optional): value for latitude. Default=0 lon (float, optional): value for longitude. Default=0 Returns: int: status code of the result dict: Result of the call as a dict Notes: See https://www.climacell.co/weather-api/ for more info on Weather API. You can get API key from there, too. """- First sentence should contain the purpose of the function
Example: Numpydoc
def send_request(key: str, lat: float = 0, lon: float = 0):
    """
    Send a request to Climacell Weather API
    to get weather info based on lat/lon.

    Climacell API provides realtime weather
    information which can be accessed using
    their 'Realtime Endpoint'.

    Parameters
    ----------
      key (str): an API key with length of 32 chars.
      lat (float, optional): value for latitude.
        Default=0
      lon (float, optional): value for longitude.
        Default=0

    Returns
    -------
      int: status code of the result
      dict: Result of the call as a dict

    Notes
    -----
      See https://www.climacell.co/weather-api/
      for more info on Weather API. You can get
      API key from there, too.
    """
- Type Hinting
This doesn’t check the type; it’s just metadata
Using type hints enables you to perform type checking. If you use an IDE like PyCharm or Visual Studio Code, you’ll get visual feedback if you’re using unexpected types:
Resources
Variables:
my_variable_name: tuple[int, ...]- variable should be a tuple that contains only integers. The ellipsis says the total quantity is unimportant.
Functions
def get_count(threshold: str, column: str, df: pd.DataFrame) -> int: return (df[column] > threshold).sum()- “threshold”, “column” should be strings (str)
- “df” should be a pandas dataframe (pd.DataFrame)
- Output should be an integer (int)
Function as an arg:
Callable[[Arg1Type, Arg2Type], ReturnType]Example:
from collections.abc import Callable def foo(bar: Callable[[int, int], int], a: int, b: int) -> int: return bar(a, b)- “bar” is a function arg for the function, “foo”
- “bar” is supposed to take: 2 integer args ([int, int]) and return an integer (int)
Example:
def calculate(i: int, action: Callable[..., int], *args: int) -> int: return action(i, *args)- “action” takes any number and type of arguments but must return an integer.
- With *args: int, you also allow a variable number of optional arguments, as long as they’re integers.
Example: Lambda
f: Callable[[int, int], int] = lambda x, y: 3*x + y- May not work
Args and Operators
Misc
** Args are not reset to default values after each call **
Example:
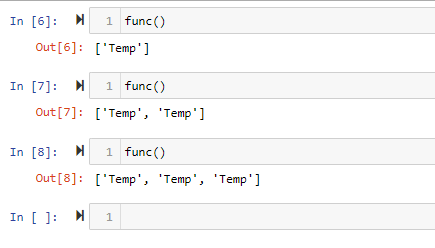
def func(list1=[]):      # here l1 is a default argument set to []
    list1.append("Temp")
    return list1
“None” + conditional must be used to get the arg to reset back to the default value

def func(l1=None):
    if l1 is None:
        l1 = []
    l1.append("Temp")
    return l1
*
- Unpacks Lists
num_list = [1,2,3,4,5]
num_list_2 = [6,7,8,9,10]

print(*num_list)
# 1 2 3 4 5
new_list = [*num_list, *num_list_2] # merge multiple lists
# [1,2,3,4,5,6,7,8,9,10]
*args
- Functions that can accept a varying number of values
def names_tuple(*args):
    return args

names_tuple('Michael', 'John', 'Nancy')
# ('Michael', 'John', 'Nancy')
names_tuple('Jennifer', 'Nancy')
# ('Jennifer', 'Nancy')
**
- Unpacks Dictionaries
num_dict = {‘a’: 1, ‘b’: 2, ‘c’: 3}
num_dict_2 = {‘d’: 4, ‘e’: 5, ‘f’: 6}

print(*num_dict) # only keys printed
# a b c
new_dict = {**num_dict, **num_dict_2} # merge dictionaries
# {‘a’: 1, ‘b’: 2, ‘c’: 3, ‘d’: 4, ‘e’: 5, ‘f’: 6}
**kwargs
- Functions that can accept a varying number of variable/value pairs (like a … in R)
def names_dict(**kwargs):
    return kwargs

names_dict(Jane = 'Doe')
# {'Jane': 'Doe'}
names_dict(Jane = 'Doe', John = 'Smith')
# {'Jane': 'Doe', 'John': 'Smith'}
Function as an arg
def classic_boot(df, estimator, seed=1): df_boot = df.sample(n=len(df), replace=True, random_state=seed) estimate = estimator(df_boot) return estimate- Bootstrap function with an “estimator” function (e.g. mean) as arg
- Using a Callable
Class as an arg
from dataclasses import dataclass @dataclass class Person: name: str age: int address: str phone: str email: str def process_data(person: Person): print(f"Processing data for {person.name}, {person.age}, living at {person.address}. Contact info: {person.phone}, {person.email}") person = Person("Alice", 30, "123 Main St", "555-1234", "alice@example.com") process_data(person)- Makes function more readable when the function requires a bunch of args
Class as an arg (safer alternative)
from typing import NamedTuple

class Person(NamedTuple):
    name: str
    age: int
    address: str
    phone: str
    email: str

def process_data(person: Person):
    print(f"Processing data for {person.name}, {person.age}, living at {person.address}. Contact info: {person.phone}, {person.email}")

person = Person("Alice", 30, "123 Main St", "555-1234", "alice@example.com")
process_data(person)
Using
NamedTuplemeans that the attributes cannot be overridden- e.g. Executing
person.name = "Bob"will result in an error because tuples can’t be modified.
- e.g. Executing
Make an arg optional
lass Address: def __init__(self, street, city, state, zipcode, street2=''): self.street = street self.street2 = street2 self.city = city self.state = state self.zipcode = zipcode- “street2” has default value of an empty string, so it’s optional
Best Practices
- Don’t mutate dataframes inside functions. Create new objects instead.
Bad: Mutates df
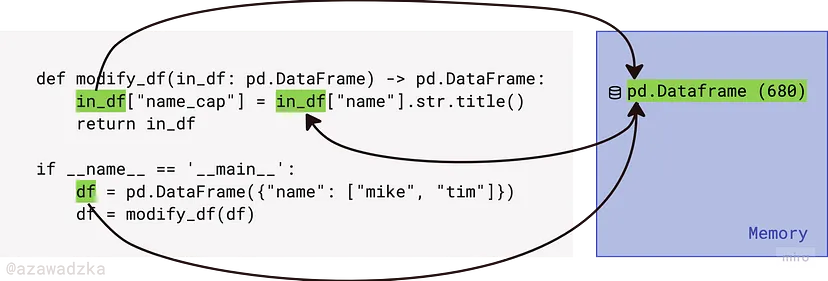
- The value of df has been assigned to variable in_df[df] when it was passed to
modify_dfas an argument. - Both the original df and the in_df inside the function point to the same memory location, even if they go by different variable names. During the modification of its attributes, the location of the mutable object remains unchanged.
- Since the original instance has been modified, it’s redundant to return the DataFrame and assign it to the variable.
- Note: This situation is not the case for immutable objects like Strings.
- The value of df has been assigned to variable in_df[df] when it was passed to
Good: Utilizes a deep copy of the df before mutating
def compute_length(word: str) -> int:
    return len(word)

def prepare_data(df: pd.DataFrame) -> pd.DataFrame:
    return pd.concat([
        df.copy(deep=True),  # deep copy
        df.name.apply(compute_length).rename("name_len"),
        ...
    ], axis=1)
Lambda
Useful if you just have 1 expression that you need to execute.
Best Practices
lambdais an anonymous function, hence it is not a good idea to store it in a variable for future use- Don’t use lambdas for single functions (e.g. sqrt). Make sure it’s an expression.
Example
# bad sqrt_list = list(map(lambda x: math.sqrt(x), mylist)) # good sqrt_list = list(map(math.sqrt, mylist))- Affects performance
- Don’t use for complex expressions that require more than 1 line (meh)
Per PEP8 guidelines, Limit all lines to a maximum of 79 characters
Example
# bad (118 characters)
df["FinalStatus"] = df["Status"].map(lambda x: 'Completed' if x ==
'Delivered' or x == 'Shipped' else 'Not Completed')
# instead
df["FinalStatus"] = ''
df.loc[(df["Status"] == 'Delivered') |
      (df["Status"] == 'Shipped'),
      'FinalStatus'] = 'Completed'
df.loc[(df["Status"] == 'Not Delivered') |
      (df["Status"] == 'Not Shipped'),
      'FinalStatus'] = 'Not Completed'
Example: 1 arg
# py lambda x: np.sin(x / period * 2 * np.pi) # r ~sin(.x / period * 2 * pi) # r \(x) {sin(x / period * 2 * pi)}Example: 2 args
Greater = lambda x, y : x if(x > y) else y
Greater(0.002, 0.5897)
Lambda-Filter
Faster than a comprehension
Format:
filter(function, data_object)- Returns a filter object, which needs to be converted into data structure such as list or set
Example: Basic
yourlist = list(np.arange(2,50,3)) list(filter(lambda x:x**2<100, yourlist)) # Output [2, 5, 8]Example: Filter w/logical
import pandas as pd import datetime as dt # create a list of 10,000 dates datlist = pd.date_range(dt.datetime.today(), periods=10000).tolist() # convert the dates to strings via list comprehension datstrlist = [d.strftime("Day %d in %B of year %Y is a %A") for d in datlist] datstrlist[:4] ['Day 21 in October of year 2021 is a Thursday', 'Day 22 in October of year 2021 is a Friday', 'Day 23 in October of year 2021 is a Saturday', 'Day 24 in October of year 2021 is a Sunday'] strLamb = filter(lambda d: ((d.endswith("urday") or d.endswith("unday")) and "Oc" in d), datstrlist)- Searches for Saturdays and Sundays in the month of October of all years in list of strings
Example: Nested Lists
group1 = [1,2,3,43,23,42,8,3,7] group2 = [[3, 34, 23, 32, 42], [6, 11, 9], [1, 3,9,7,2,8]] [list(filter(lambda x: x in group1, sublist)) for sublist in group2] >> [[3, 23, 42], [], [1, 3, 7, 2, 8]]- Probably useful for json
- for-loop attached to the end of the list-filter combo
- Each sublist of group 2 is fed into the lambda-filter and compared to the group 1 list
Iterating over each element of a list
Example:
maplist(map(lambda x: x**2+x**3, yourlist))mapreturns a map object that needs to be converted
Example: 2 Lists
mylist = list(np.arange(4,52,3)) yourlist = list(np.arange(2,50,3)) list(map(lambda x,y: x**2+y**2, yourlist, mylist))- Like a pmap
Nested lambdas
Example:
maparr = [1,2,3,4,5] list(map(lambda x: x*2, filter(lambda x: x%2 == 0, arr))) >> [4,8]- Work inside out (locate where the data object, arr, appears)
- “arr” is filtered by the first lambda function for even numbers then iterated by map to be squared by the second lambda function
Iterate over rows of a column in a df
Example: Using formula over rows
grade['evaluate']=grade['MathScore'].apply(lambda x: round((x**x)/2,2))- “grade” is the df; “MathScore” is a numeric column; “evaluate” is the new column in the df
- Formula applied to each value of “MathScore” to generate each value of evaluate
Example: Conditional over rows
grade['group']=grade['MathScore'].apply(lambda x: 'Excellent' if x>=3.0 else 'Average')- “grade” is the df; “MathScore” is a numeric column; “group” is the new column in the df
- Conditional applied to each value of “MathScore” to generate each value of “group”
Using {{swifter}} for parallelization
import swifter
df['e'] = df.swifter.apply(lambda x: infer(x['a'], x['b'], x['c'], x['d']), axis = 1)
In a Pivot Table (like a crosstab)
Example
- grades_df
- 2 names (“name”)
- 6 scores (“score”)
- Only 2 letter grades associated with these scores (“letter grade”)
- Task: drop lowest score for each letter grade, then calculate the average score for each letter grade
grades_df.pivot_table(index='name', columns='letter grade', values='score', aggfunc = lambda series : (sorted(list(series))[-1] + sorted(list(series))[-2]) / 2) letter grade A B name Arif 96.5 87.0 Kayla 95.5 84.0- index: each row will be a “name”
- columns: each column will be a “letter grade”
- values: value in the cells will be from the “score” column according to each combination columns in the index and columns args
- aggfunc: uses a lambda to compute the aggregated values
- “series” is used a the variable in the lambda function
- sorts series (ascending), takes the top two values (using negative list indexing), and averages them
- grades_df
Scope
- Populated objects within functions persist if you instantiate the object in the argument
.jpg)
- “all_numbers” retained it’s previous value when the 2nd call to the function was made
Closures
Inner functions that can access values in the outer function, even after the outer function has finished its execution
Example
# closure way def balanceOwed(roomN,rate,nights): def increaseByMeals(extra): amountOwned=rate*nights+extra print(f"Dear Guest of Room [{roomN}]{style='color: #990000'}, you have", "a due balance:", "${:.2f}".format(amountOwned)) return amountOwned return increaseByMeals ba = balanceOwned(201,400,3) ba(200) ba(150) ba(180) ba(190) Dear Guest of Room 201, you have a due balance: $1400.00 Dear Guest of Room 201, you have a due balance: $1350.00 Dear Guest of Room 201, you have a due balance: $1380.00 Dear Guest of Room 201, you have a due balance: $1390.00- Tedious way: For each value of “extra” (e.g. meals), the function needs to be called even if the other values of the arguments don’t change.
- Closure way:
- increaseByMeals() is a closure function, because it remembers the values of the outer function balanceOwed(), even after the execution of the latter
- balanceOwed() is called with its three arguments only once and then after its execution, we call it four times with the meal expenses (“extra”).
Modules
.py files are called “modules.”
A directory with .py files in which one of the files is an “__init__.py” is called a package.
Misc
- Resource: Make your Python life easier by learning how imports find things
sys.pathcontains the list of paths where Python is looking for things to import. Your virtual environment and the directory containing your entry point are automatically added tosys.path.sys.pathis a list. Which means you can.append(). Any directory you add there will have its content importable. It’s a useful hack, but use it as a last resort.
- When using -m flag to run a script, if you pass a package instead of a module, the package must contain a “__main__.py” file for it to work. This __main__.py module will run.
- If you have scripts in your projects, don’t run them directly. Run them using “-m”, and you can assume everything starts from the root.
Example:
top_dir ├── foo │ ├── bar.py │ ├── __init__.py │ └── blabla.py └── blabla.py- Running
python foo/bar.py, “top_dir” is the current working directory, but “foo” is added to thesys.path. - Running
python -m foo.bar, “top_dir” is the current working directory and added tosys.path.- Imports can all start from the root of the project and opened file paths as well.
- Running
Usage
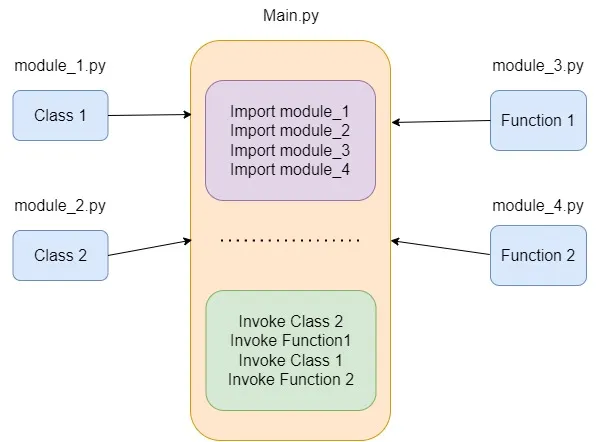
Project Structure
├── main.py
├── packages
│  └── __init__.py
│  └── module_1.py
│  └── module_2.py
│  └── module_3.py
└── └── module_4.py
“__init__.py” contains only 1 line which declares all the functions (or classes?) that are in the modules
__all__ = ["func1", "func2"]- If the module files contained classes with multiple functions, I think you’d just declare the classes and not every function in that class.
- If using classes, each module should only have 1 class.
- If the module files contained classes with multiple functions, I think you’d just declare the classes and not every function in that class.
Scripts need to include “_main_” in order to used in other scripts
# test_function.py def function1(): print("Hello world") function1() # Define the __main__ script if __name__ == '__main__': # execute only if run as a script function1()- Says if this file is being run non-interactively (i.e. as a script), run this chunk
- Add
else:chunk, then that chunk will be run only if the file is imported as a module - Allows you to allow or prevent parts of code from being run when the modules are imported
- Importing a module without _main_ in a jupyter notebook results in this

Loading
DO NOT USE
from <library> import *This will import anything and everything from that library and causes several problems:
You don’t know what is in that package, so you have no idea what you just imported, or even if what you want is in there.
You just filled your local namespace with an unknown quantity of mysterious names, and you don’t know what they will shadow.
Your editor will have a hard time helping you since it doesn’t know what you imported.
Your colleague will hate you because they have no idea what variables come from where.
Exception: In the shell, it’s handy. Sometimes, you want to import all things in __init__.py and you have “__all__” defined (see above)
From the working directory, it’s like importing from a library:
from file1 import function1From a subdirectory,
from subdirectory.file1 import function1From a directory outside the project, add the module to sys.path before importing it
import sys
sys.path.append('/User/moduleDirectory')
When a module is imported, it first searches for built-in modules, then the paths listed in
sys.pathThis appends the new path to the end of the sys.path
import sys
sys.path.insert(1, '/User/moduleDirectory')
Puts this path at the front of the sys.path directory list.
import sys sys.path.remove('/User/NewDirectory')- *delete path from sys.path after you finish*
- Python will also search this path for future projects unless they are removed
Conditionals
If-Else
Syntax
if <expression>:
    do something
else:
    do something else
Example
regenerate = False
if regenerate:
    concepts_list = df2Graph(df, model='zephyr:latest')
    dfg1 = graph2Df(concepts_list)
    if not os.path.exists(outputdirectory):
        os.makedirs(outputdirectory)

    dfg1.to_csv(outputdirectory/"graph.csv", sep="|", index=False)
    df.to_csv(outputdirectory/"chunks.csv", sep="|", index=False)
else:
    dfg1 = pd.read_csv(outputdirectory/"graph.csv", sep="|")
Try-Except
Example
import os try: env_var = os.environ['ENV'] except KeyError: # Do something- If “ENV” is not a present a KeyError is thrown. Then,
exceptsection executed.
- If “ENV” is not a present a KeyError is thrown. Then,
Match (> Python 3.10) (switch function)
match object:
    case <pattern_1>:
        <action_1>
    case <pattern_2>:
        <action_2>
    case <pattern_3>:
        <action_3>
    case _:
        <action_wildcard>
“object” is just a variable name; could be anything
“case_” is the value used when none of the other cases are a match
Example: function input inside user function
def http_error(status): match status: case 200: return 'OK' case 400: return 'Bad request' case 401 | 403 | 404: return 'Not allowed' case _: return 'Something is wrong'Example: dict input inside a function
def get_service_level(user_data: dict): match user_data: case {'subscription': _, 'msg_type': 'info'}: print('Service level = 0') case {'subscription': 'free', 'msg_type': 'error'}: print('Service level = 1') case {'subscription': 'premium', 'msg_type': 'error'}: print('Service level = 2')Example: inside a class
class ServiceLevel: def __init__(self, subscription, msg_type): self.subscription = subscription self.msg_type = msg_type def get_service_level(user_data): match user_data: case ServiceLevel(subscription=_, msg_type='info'): print('Level = 0') case ServiceLevel(subscription='free', msg_type='error'): print('Level = 1') case ServiceLevel(subscription='premium', msg_type='error'): print('Level = 2') case _: print('Provide valid parameters')- Note that inside the function, the change from “:” to “=” and “()” following the class name in the “case” portion of the match
Assert
- Used to confirm a condition
Incorrect: assert condition, message Correct method: if not condition: raise AssertionErrorassertis useful for debugging code because it lets you test if a condition in your code returns True, if not, the program will raise an AssertionError.- ** Do not use in production, because when code is executed with the -O (optimize) flag, the assert statements are removed from the bytecode. **
Loops
- Misc
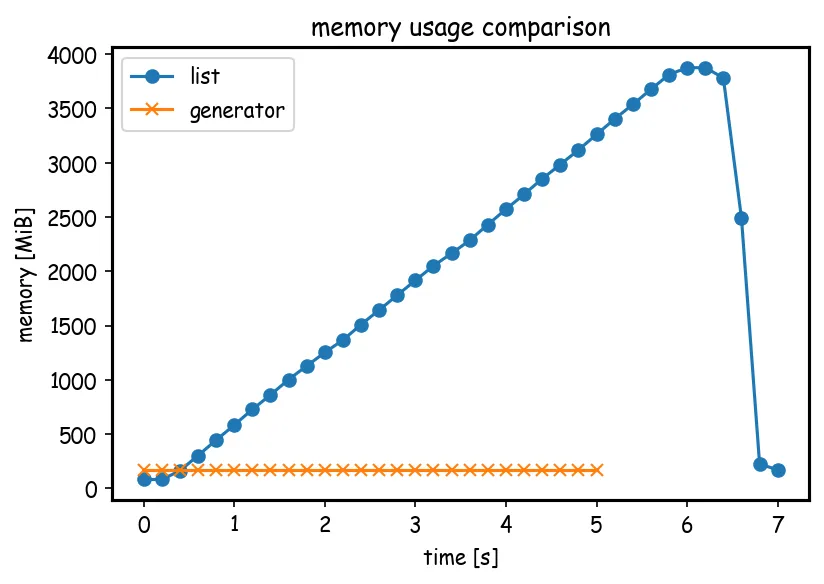
List Comprehensions vs Generators in terms of memory usage
{{tqdm}} - progress bar for loops
from tqdm import tqdm for i in tqdm(range(10000)) ...breakterminates the loop containing it- If in a nested loop, it will terminate the inner-most loop containing it
continueis used to skip the remaining code inside a loop for the current iteration only; forces the start of the next iteration of the looppassdoes nothing- used when a statement or a condition is required to be present in the program but we do not want any command or code to execute
Iterators
Remembers values
Example
D = {"123":"Y","111":"PT","313":"Y","112":"Y","201":"PT"} ff = filter(lambda e:e[1]=="Y", D.items()) print(next(ff)) >> ('123', 'Y') print(next(ff)) >> ('313', 'Y')applyaxis
0 or ‘index’: apply function to each column.
1 or ‘columns’: apply function to each row.
Example: Function applied to rows of a column of a dataframe (i.e. cells)
def df2Graph(dataframe: pd.DataFrame, model=None) -> list: # dataframe.reset_index(inplace=True) results = dataframe.apply( lambda row: graphPrompt(row.text, {"chunk_id": row.chunk_id}, model), axis=1 )- text and chunk_id are column names of the dataframe
- row is the row of the dataframe since axis=1, and from that row, the columns text and chunk_id are subsetted in the arguments of user-defined function.
Example: Formula applied to rows of a column of a dataframe (i.e. cells)
grade['evaluate']=grade['MathScore'].apply(lambda x: round((x**x)/2,2))- grade is the df; MathScore is a numeric column; evaluate is the new column in the df
Generators
Generators are iterators, a kind of iterable you can only iterate over once. (normal iterators like lists, strings, etc. can be repeatedly iterated over)
Generators do not store all the values in memory, they generate the values on the fly
yield- Pauses the function saving all its states and later continues from there on successive calls.- Allows you to consume one element at a time and work with it without requiring you to have every element in memory.
- Produces a generator
Misc
- {{itertools}}
islicecan slice a generator. - Also see APIs >> {{requests}} for an example
- {{itertools}}
Example: Using a comprehension
mygenerator = (x*x for x in range(3)) for i in mygenerator: ... print(i)- Produce a list and ( ) produce a generator
Example: Using a function
def create_generator(): mylist = range(3) for i in mylist: yield i*i for i in mygenerator: print(i) 0 1 4- The first time the for calls the generator object created from your function, it will run the code in your function from the beginning until it hits yield, then it’ll return the first value of the loop.
- Then, each subsequent call will run another iteration of the loop you have written in the function and return the next value.
- This will continue until the generator is considered empty, which happens when the function runs without hitting yield.
- That can be because the loop has come to an end, or because you no longer satisfy an “if/else”
Example: Sending values to
(yield)def grep(pattern): print "Looking for %s" % pattern while True: line = (yield) if pattern in line: print line, g = grep("python") # instantiate with "python" pattern to search for g.next() # Prime it >> Looking for python g.send("A series of tubes") # "python" not present so returns nothing g.send("python generators rock!") # "python" present so returns line >> python generators rock! g.close() # closes coroutine- (yield) receives the input of the .send method and creates a generator object which is assigned to “line”.
- All coroutines must be “primed” by first calling .next() (or send(None))
- This advances execution to the location of the first yield expression
Example: Sending values to (yield)
def writer(): """A coroutine that writes data *sent* to it to fd, socket, etc.""" while True: w = (yield) print('>> ', w) def writer_wrapper(coro): # TBD pass w = writer() wrap = writer_wrapper(w) wrap.send(None) # "prime" the coroutine for i in range(4): wrap.send(i) >> 0 >> 1 >> 2 >> 3- A more complex framework if you want to break the workflow into multiple functions
Using yield from
Allows for two-way usage (reading/sending) of generators
Example (reading from a generator)
def reader(): """A generator that fakes a read from a file, socket, etc.""" for i in range(4): yield '<< %s' % i # with yield def reader_wrapper(g): # Manually iterate over data produced by reader for v in g: yield v # OR with yield from def reader_wrapper(g): yield from g wrap = reader_wrapper(reader()) for i in wrap: print(i)- Basic; only eliminates 1 line of code
Example (sending to a generator)
# with (yield) def writer_wrapper(coro): coro.send(None) # prime the coro while True: try: x = (yield) # Capture the value that's sent coro.send(x) # and pass it to the writer except StopIteration: pass # OR with yield from def writer_wrapper(coro): yield from coro- Need to see example 4 for the writer() code and the use case
- Shows the other advantage of using “yield from”: it automatically includes the code to stop prime and stop the loop.
Reusable generator
- reading example using “yield from”
Slicing a generator
from itertools import islice
def gen():
    yield from range(1,11)
g = gen()
myslice = islice(g, 2)
>> list(myslice)
[1, 2]
>> [i for i in g]
[3,4,5,6,7,8,9,10]
For

Syntax -
for <sequence>: <loop body>Pre-allocate memory to optimize performance of for-loops
import numpy as np # bad result = [] # good result = np.zeros(10) # Pre-allocate for i in range(10): result[i] = i ** 2- Also see Python, Numpy >> Create or Coerce >> Create an empty array for specifying columns and types for even more efficiency
Numeric Range
for i = 1 to 10 <loop body> # from 0 to 519 for i in range(520) <loop body> res = 0 for idx in np.arange(0, 100000): res += df.loc[idx, 'int']np.arange()ran 8000 times faster than the same chunk usingrange()
List
numbers = [1, 2, 3, 4, 5, 6, 7, 8, 9]
even_numbers = []
for item in numbers:
    if item % 2 == 0:
        even_numbers.append(item)
print(even_numbers)

# results: [2, 4, 6, 8]
List: index and value
numbers = [1, 2, 3, 4, 5, 6, 7, 8, 9] for index, element in enumerate(numbers): if element % 2 != 0: numbers[index] = element * 2 else: continue print(numbers) # results: [2, 2, 6, 4, 10, 6, 14, 8, 18]enumeratealso gets the index of the respective element at the same time- start = 3 says start loop at index 3
With three expressions
for (for i = 1; i <= 10; i+=1)
    <loop body>
Collection-Based
- If the collection is a dict, then this just iterates over the keys
for i in <collection>:
    <loop body>
Iterate over a sliding window
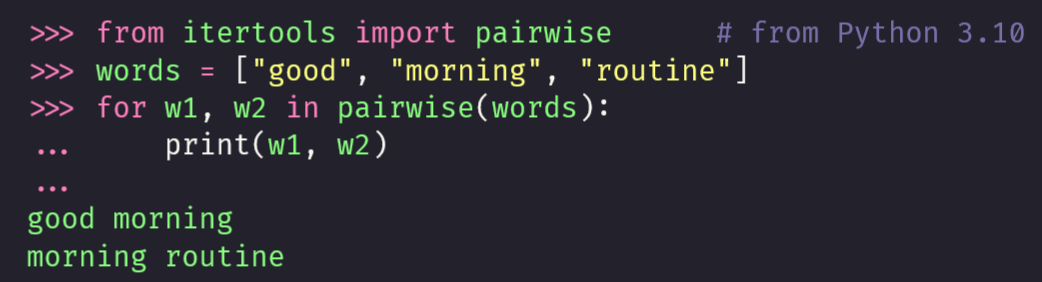
Over dictionary keys and values of a dict
for a,b in transaction_data.items(): print(a,’~’,b)- The .items method includes both key and value, so it iterates over the pairs.
Over nested dictionaries
for k, v in transaction_data_n.items(): if type(v) is dict: for nk, nv in v.items(): print(nk,’ →’, nv)- If the item of the dict is itself a dict then another loop iterates through its items.
- nk and nv stand for nested key and nested value
Selecting a specific item in a nested dictionary
for k, v in transaction_data_n.items(): if type(v) is dict and k == 'transaction_2': for sk, sv in v.items(): print(sk,'-->', sv)- Only transaction_2’ s items are printed
Rows of a data.frame
res = 0 for row in df.itertuples(): res += getattr(row, 'int')itertuples()is 30x faster thaniterrows()
zip
Combine lists into 1 list of tuples
acc_values = [1, 0.04, 0.9] acc_names = ["RMSE", "MAPE", "R-sq"] acc_list = list(zip(acc_names, acc_values)) acc_list [('RMSE', 1), ('MAPE', 0.04), ('R-sq', 0.9)]zipdoes take lists of different lengths but will create shortest length list with corresponding elementsCombine lists of unequal lengths but keep the non-paired elements
from itertools import zip_longest
acc_names3 = ["RMSE", "MAPE", "R-sq", "MSE"]
acc_values3 = [rmse, mape, rsq]
acc_list3 = list(zip_longest(acc_names3, acc_values3))
Unzip list of tuples into separate lists
names, values = zip(*acc_list)- Asterisk is the “unzipping operator”
Unpack dict into a list of separate tuples for key:value pairs
acc_tuples = list(zip(acc_dict.keys(), acc_dict.values()))
acc_tuples
[('RMSE', 1), ('MAPE', 0.04), ('R-sq', 0.9)]
Comprehensions
- Misc
- ‘for — in’ construct within comprehensions is faster than the traditional for-loops
- not faster than (all?) lambda-filters (see functions >> lambda)
- Returns lists or dicts (just change the bracket types)
- ‘for — in’ construct within comprehensions is faster than the traditional for-loops
- Dicts
Syntax:
mydict = {key:val for key, val in zip(keys_list, vals_list)}Combine key:value lists into a dictionary
acc_dict = {k:v for k,v in zip(acc_names, acc_values)}Return value and output of expression
mydict = {v: v**2 for v in numberslist}If numberslist =[1,2,3], then mydict = {1:1, 2:4, 3:9}
- Lists
Syntax:
newlist = [expression for item in iterable if condition == True]With expression
mylist = [x**2 for x in numberslist]- if numberslist =[1,2,3], then mylist = [1,4,9]
Set values in a list to uppercase
newlist = [x.upper() for x in fruits]With conditional expression (if — else)
- Append to the comprehension to filter the dictionary or list
- Syntax: mylist = [expressionA if (condition2==True) else expressionB for item in list if (condition1==True)]
- Example:
newlist = [x if x != "banana" else "orange" for x in fruits]- Return “orange” instead of “banana”
- Example:
new_list = [(x**2) if (x>90) else (x**3) for x in old_list if (x%2==0)]- Says
- Square an argument if it exceeds 90, else cube it
- Return all the exponentiated results only if the argument was an even number
- Says
- Example:
c = [d for d in datstrlist if ((d.endswith("urday") or d.endswith("unday")) and "Oc" in d)]- String filter than looks for strings with saturdays and sundays in october
- *Slower than a lamda-filter* (See Functions >> lambda)
- Nested
Syntax:
myset = {{expression(itemA, itemB) for itemA in setA} for itemB in setB}Example:
{j for i in range(2, int(N**0.5)+1) for j in range(i**2, N, i)}- N = 100000
- Creates a set of all the integers from 2 to 100,000.
- Paces through all the integers i up to the square root of N
- Discards from the set of 100,000 those numbers j which are equal or larger than the square of i
Example: From link
# Function to get set labels def get_prediction_set_labels(prediction_set, class_labels): # Get set of class labels for each instance in prediction sets prediction_set_labels = [ set([class_labels[i] for i, x in enumerate(prediction_set) if x]) for prediction_set in prediction_sets] return prediction_set_labels- Returns a list where each object in the list is a set object (e.g. {green}, {green, orange})
Debugging
- Misc
- Terms
- Exception Errors - Raised when the syntax is correct but the program results in an error.
- Syntax Errors - Occur when the interpreter detects invalid syntax (relatively easier to fix)
- e.g. unmatched parenthesis
- Traceback - A report that helps us understand the reason for an exception.
- Contains function calls made in the code along with their line numbers
Error Handling
Conditional w/ValueError
if validation_result.above_threshold(level="error"): print("RAISING ERROR NOW!") raise ValueError("VALIDATION FAILED - STOPPING RENDER!")try+except- Also see plenty of examples in other notes. Search “try:”
- Says try the main code snippet, but if an exception (error) occurs, run the secondary code snippet, the workaround.
def pct_difference_error_handling(n1, n2): '''Function that takes two numbers and return the percentual difference between n1 and n2, being n1 the reference number''' # Try the main code try: pct_diff = (n1-n2)/n1 return f'The difference between {n1} and {n2} is {n1-n2}, which is {pct_diff*100}% of {n1}' # If you find an error, use this code instead except: pct_diff = (int(n1)-int(n2))/int(n1) return f'The difference between {n1} and {n2} is {int(n1)-int(n2)}, which is {pct_diff*100}% of {n1}' # Optional finally: print("Code ended")- Assumes the error will be the user enters a string instead of a numeric. If errors, converts string to numeric and calcs.
finally:- This argument will always run, regardless if the try block raises an error or not. So it could be a completion message or a summary, for example.